
Summary
In the previous article, you downloaded the Ubuntu 26.04 LTS Server ISO and Rufus and checked whether the computer on which you will install Ubuntu uses Legacy BIOS or UEFI.
In this article, you will write the prepared ISO file to a USB drive with Rufus to create bootable Ubuntu Server installation media.
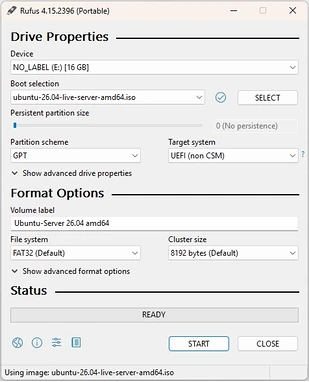
The most important step is choosing Rufus’s Partition scheme and Target system to match the target computer’s boot mode.
| Target Computer | Partition Scheme | Target System |
|---|---|---|
| Legacy BIOS | MBR | BIOS or UEFI-CSM |
| UEFI | GPT | UEFI |
Using a USB drive created exclusively for GPT/UEFI on a Legacy BIOS computer, or connecting a Legacy-mode USB drive to a computer configured for UEFI only, may prevent the drive from appearing in the Boot Menu or starting the boot process.
However, some computers and Ubuntu ISOs support multiple boot methods, so different settings do not necessarily fail on every computer. What matters is matching Rufus’s settings to the target computer’s current boot mode.
Ubuntu 26.04 LTS is an LTS release from April 2026. Its Ubuntu Server image for Intel or AMD 64-bit computers is available from the official website. Ubuntu Downloads, Ubuntu 26.04 LTS Release Notes
Who This Article Is For
- Anyone creating an Ubuntu 26.04 LTS Server installation USB drive
- Anyone writing an Ubuntu ISO to USB with Rufus on Windows
- Anyone checking how Rufus settings differ between Legacy BIOS and UEFI
- Anyone investigating why a completed USB drive does not appear in the Boot Menu or does not boot
Before You Begin
What You Need
- A Windows computer
- The computer on which Ubuntu Server will be installed
- A USB flash drive with a capacity of at least 8 GB
- The Ubuntu 26.04 LTS Server ISO
- The Rufus Standard or Portable executable
- Information about the target computer’s boot mode
Starting the Rufus operation deletes all existing data on the selected USB drive. Back up important files to another storage device first.
Estimated Time
- Configuring Rufus: about 5 minutes
- Writing the ISO: about 5–20 minutes, depending on USB speed
- Checking boot: about 5 minutes
Scope of This Article
This step covers only the following tasks:
- Connect the USB drive.
- Select the Ubuntu ISO in Rufus.
- Choose settings for Legacy BIOS or UEFI.
- Write the ISO to the USB drive.
- Check whether the completed USB drive boots.
The actual Ubuntu Server installation is covered in the next article.
Verification Environment
- USB creation environment: a Windows computer
- Installation target: Intel NUC Kit D34010WYKH
- Processor: Intel Core i3-4010U
- BIOS: Intel Visual BIOS 2.1.2
- Ubuntu: Ubuntu 26.04 LTS Server
- ISO architecture: Intel or AMD 64-bit
- Rufus: Portable executable
- USB capacity: 8 GB or more
- Test date recorded in the source article: July 14, 2026
The items shown on screen may differ slightly depending on the Rufus version and the computer’s firmware configuration.
Instructions
1. Connect the USB Drive
Connect the USB drive you will use for Ubuntu installation to the Windows computer.
If the USB drive still contains files you need, copy them to another storage device before running Rufus.
Where possible, connect directly to a USB port on the computer rather than through a USB hub. If you plan to boot an older computer, it is worth checking recognition on a USB 2.0 port as well as a USB 3.x port.
Some older Legacy BIOS computers may not recognize USB 3.x devices correctly during startup.
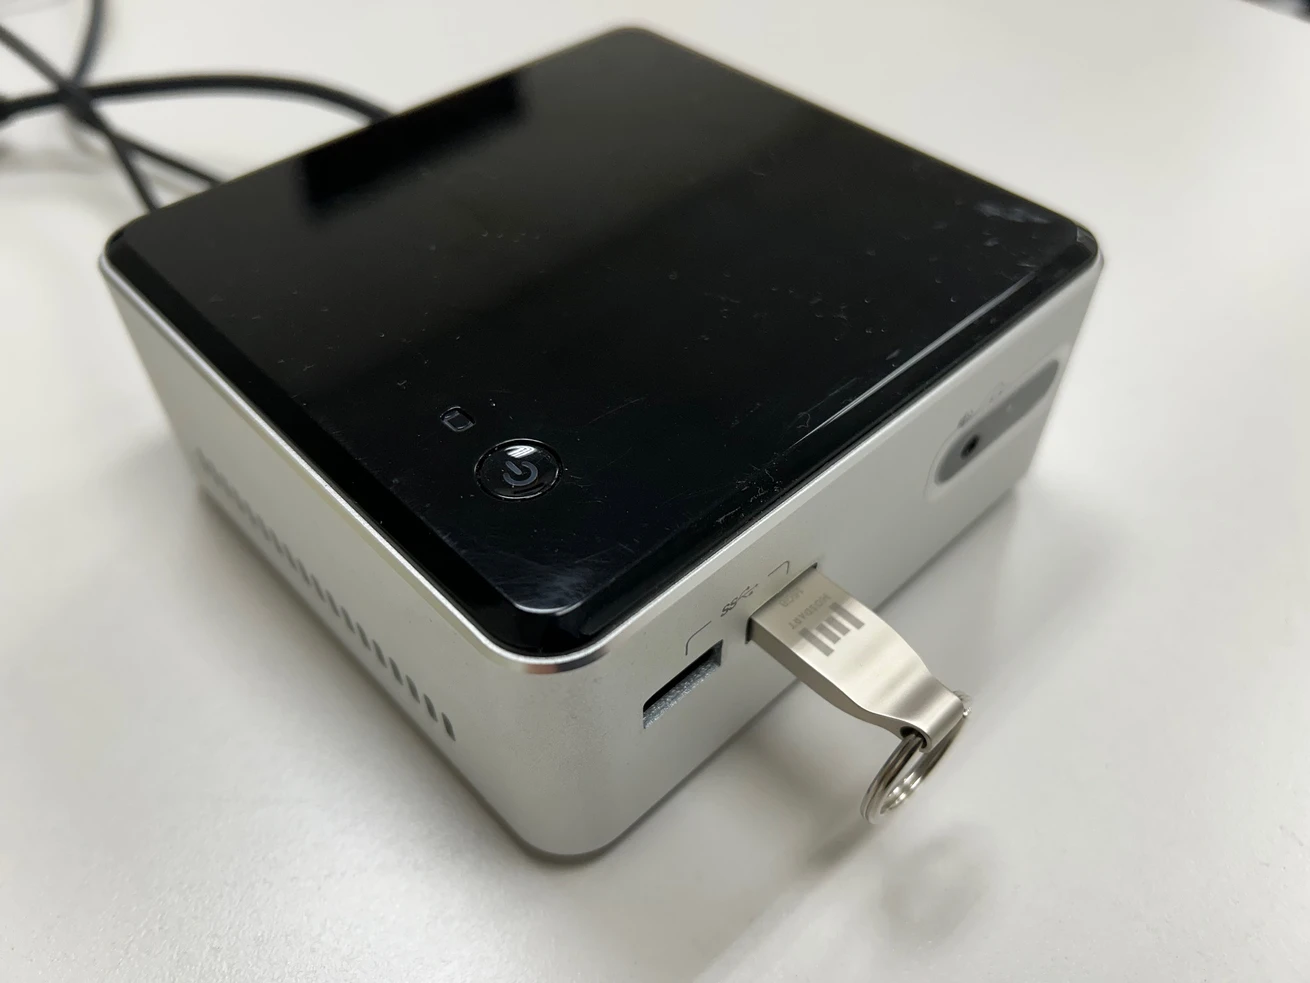
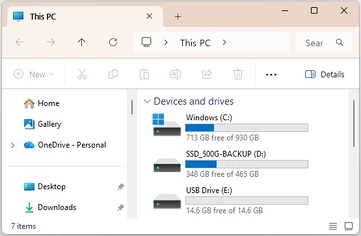
In Windows File Explorer, check that the USB drive letter and capacity match the device you intend to use.
2. Run Rufus and Check the USB Device
Double-click the Rufus executable you downloaded.
rufus-4.15p.exe
If Windows displays a User Account Control prompt, check that the publisher is the legitimate Rufus distributor before allowing it to run.
When Rufus opens, check the Device field first.
Device: the USB drive to use for Ubuntu installation
If several USB storage devices are connected, identify the correct one by its capacity and device name.
Selecting an external SSD or backup USB drive by mistake can erase its data. If you are unsure about a storage device, it is safer to disconnect it before proceeding.
3. Select the Ubuntu 26.04 LTS Server ISO
Click SELECT to the right of Boot selection.
In the Windows Downloads folder, select the Ubuntu Server ISO downloaded in the previous article.
ubuntu-26.04-live-server-amd64.iso
After selection, check that Rufus’s Boot selection field displays the Ubuntu ISO filename.
Copying the ISO onto USB as an ordinary file does not create bootable installation media. Use a tool such as Rufus to write the ISO image to the USB drive. Official Rufus Website
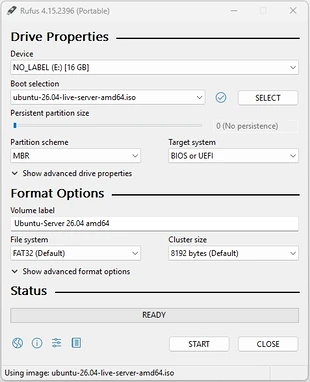
4. Check the Differences Between Legacy BIOS and UEFI Settings
The two most important fields to check in Rufus are:
Partition scheme
Target system
Configure them according to the target computer’s boot mode.
Legacy BIOS Computer
Boot selection: Ubuntu 26.04 LTS Server ISO
Partition scheme: MBR
Target system: BIOS or UEFI-CSM
UEFI Computer
Boot selection: Ubuntu 26.04 LTS Server ISO
Partition scheme: GPT
Target system: UEFI
Rufus often changes Target system automatically when you select a Partition scheme. Make a final check that these two fields match correctly.
5. Configure the USB Drive for Legacy BIOS
If the target computer uses Legacy BIOS, select MBR under Partition scheme.
Partition scheme: MBR
Target system: BIOS or UEFI-CSM
For Legacy BIOS, the USB drive generally appears in the Boot Menu under a name such as:
USB Storage Device
Generic Flash Disk
USB HDD
USB Memory
Select an entry without UEFI: before the device name.
Some older computers require enabling BIOS options such as
Legacy Boot,CSM, orUSB Legacy Supportbefore they can boot from USB.
6. Configure the USB Drive for UEFI
If the target computer uses UEFI, select GPT under Partition scheme.
Partition scheme: GPT
Target system: UEFI
The USB drive may appear in a UEFI computer’s Boot Menu as:
UEFI: USB Flash Drive
UEFI: Generic Flash Disk
In this case, select an entry with UEFI: before the device name.
Even if the computer supports UEFI, it may currently boot in Legacy or CSM mode in its BIOS settings. Match Rufus’s settings to the currently enabled mode.
7. Check the File System and Remaining Options
For an Ubuntu installation USB drive, it is best to let Rufus select the defaults appropriate for the ISO.
The main fields to check are:
Image option: standard Ubuntu installation
Volume label: the value filled in automatically by Rufus
File system: the default Rufus selects for the ISO
Cluster size: default
Do not change the file system or cluster size without a specific reason.
For UEFI boot in particular, the firmware must recognize the USB drive’s file system. Start with the defaults Rufus suggests after analyzing the Ubuntu ISO.
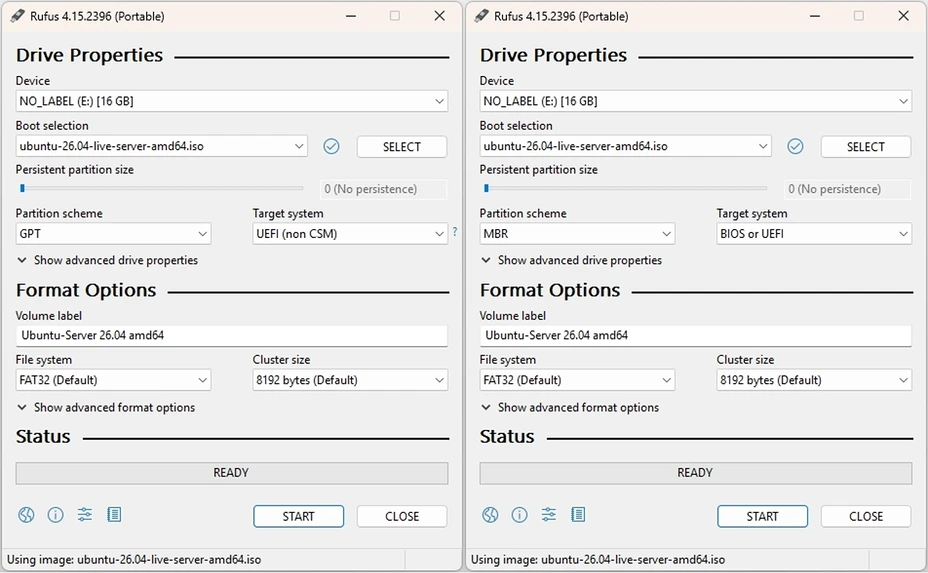
8. Perform a Final Check of Rufus Settings
Before clicking START, check the following again.
Legacy BIOS Settings Checklist
Device: the Ubuntu installation USB drive
Boot selection: ubuntu-26.04-live-server-amd64.iso
Partition scheme: MBR
Target system: BIOS or UEFI-CSM
UEFI Settings Checklist
Device: the Ubuntu installation USB drive
Boot selection: ubuntu-26.04-live-server-amd64.iso
Partition scheme: GPT
Target system: UEFI
Pay particular attention to Device. You can recreate the partition scheme, but data deleted from the wrong storage device may be difficult to recover.
9. Start Creating the Bootable USB Drive
After checking all settings, click START.
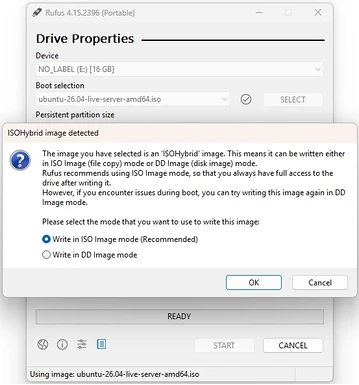
Depending on the Rufus version and ISO, a writing-mode selection window may appear.
ISO Image mode
DD Image mode
Normally, start with the ISO Image mode recommended by Rufus.
If a USB drive created in ISO Image mode does not boot on a particular computer, you can try recreating it in DD Image mode. Note that a USB drive written in DD mode may look different in Windows File Explorer.
After selecting the Ubuntu ISO and clicking START, you may see an ISOHybrid image detected window. This means the Ubuntu ISO can be written in either ISO Image mode or DD Image mode.
For the first attempt, leave Write in ISO Image mode (Recommended) selected and click OK. Consider recreating the USB drive in DD Image mode only if it subsequently fails to boot.
10. Check the USB Data Deletion Warning
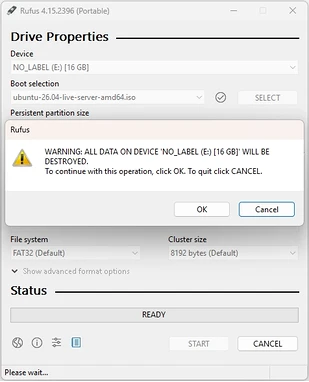
Rufus displays a warning that all data on the USB drive will be deleted.
Check the following again:
- Is the selected device the USB drive intended for Ubuntu installation?
- Have you backed up any files you need from the USB drive?
- Have you accidentally selected an external SSD or another USB drive?
Continue once these checks are complete.
After this point, the selected USB drive’s existing partitions and data will be deleted.
11. Wait for the ISO Write to Finish
Rufus starts writing the Ubuntu ISO to the USB drive.
Avoid the following while it is working:
- Do not unplug the USB drive.
- Do not force Rufus to close.
- Do not turn off or restart the computer.
- Do not run other programs that use the USB drive.
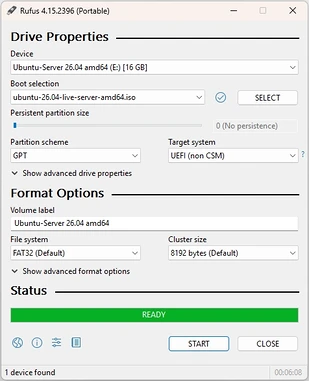
Writing is complete when the progress bar finishes and the status changes to READY.
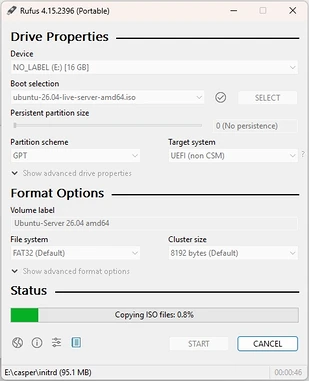
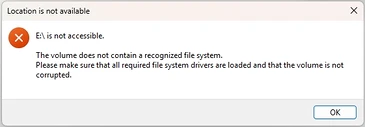
While the ISO is being written, Windows may not immediately recognize the USB drive’s changed partitions or file system. Messages such as Location is not available or The volume does not contain a recognized file system may appear.
Do not assume that Rufus has failed based on this message alone. If Windows offers to format the USB drive, do not proceed. Close the warning with OK and wait until Rufus displays READY.
12. Safely Remove the USB Drive
Close Rufus after the operation completes.
Use the Windows taskbar’s Safely Remove Hardware feature to remove the USB drive.
Connect the drive to the computer on which you will install Ubuntu.
13. Select the USB Drive in the Boot Menu
Immediately after powering on the Intel NUC used in this article, press F10 repeatedly to open the one-time Boot Menu. This does not change the default boot order saved in BIOS.
On a wired keyboard with independent function keys from F1 through F12, pressing F10 during startup worked normally. On keyboards that require holding Fn to use function keys, Fn+F10 may not be recognized during early startup. If the Boot Menu does not open, switch to a wired USB keyboard with independent function keys and try again.
BIOS Setup and Boot Menu keys for other manufacturers vary by model. For representative keys and precautions, see the previous article, Preparing a Computer for Ubuntu LTS Server Installation.
If You Created the Drive for Legacy BIOS
Select a USB entry without UEFI:, such as:
USB Storage Device
Generic Flash Disk
If You Created the Drive for UEFI
Select a USB entry with UEFI:, such as:
UEFI: USB Flash Drive
The same USB drive may appear twice in the Boot Menu.
UEFI: USB Flash Drive
USB Flash Drive
If you configured Rufus for GPT/UEFI, select the entry with UEFI:. If you created the drive for MBR/Legacy, select the ordinary USB entry.
14. Check That the Bootable USB Drive Works
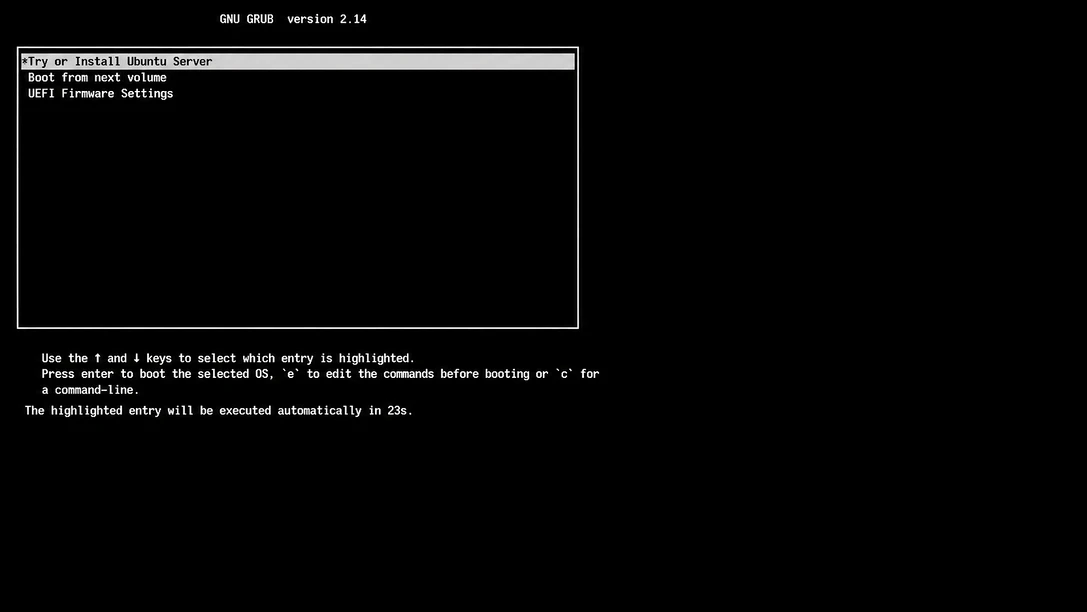
If the computer boots successfully from USB, the Ubuntu Server installation menu appears.
This article only checks that the USB drive boots correctly; it does not perform the installation.
Once the installation screen appears, you may shut down the computer until you are ready to follow the next article.
What Happens If Legacy and UEFI Settings Do Not Match?
If the USB drive’s boot method does not match the computer’s boot mode, you may encounter:
- The USB drive does not appear in the Boot Menu.
- The USB drive appears, but selecting it returns to the existing Windows installation.
No bootable deviceappears.- The computer stops at a black screen.
- The computer skips USB and boots from the internal SSD.
- The same USB drive appears twice in the Boot Menu, but only one entry works.
For example, a drive created for GPT/UEFI may not boot on a Legacy BIOS-only computer. Conversely, a drive created for MBR/Legacy may not appear as a UEFI entry or may be blocked by firmware settings on a computer configured for UEFI only.
The solution is to check the computer’s current boot mode and recreate the USB drive to match it.
Common Problems
The USB Drive Does Not Appear in the Boot Menu
Check the following in order:
- Check that the USB drive is connected properly.
- Connect it to another USB port.
- Try a USB 2.0 port if available.
- Check that
USB Bootis enabled in BIOS. - On a Legacy computer, check
CSMorLegacy USB Support. - On a UEFI computer, look for the
UEFI: USB nameentry. - Check that Rufus’s MBR/GPT settings match the computer’s boot mode.
- Recreate the USB drive with Rufus.
Selecting the USB Drive Still Starts the Existing Operating System
- Check whether you selected the internal SSD instead of USB in the Boot Menu.
- Set USB as the first device in the boot priority.
- Recheck the boot mode and Rufus settings.
- Check that writing the ISO completed successfully.
No bootable device Appears
Common causes include:
- Mismatched Legacy BIOS and UEFI settings
- A failed ISO write
- A damaged ISO file
- An old or faulty USB drive
- USB boot disabled in firmware
- Selecting the wrong USB entry in the Boot Menu
Both UEFI and Ordinary USB Entries Appear
The same USB drive may appear twice in the Boot Menu:
UEFI: USB Flash Drive
USB Flash Drive
If the drive was created for GPT/UEFI, select the first entry.
If it was created for MBR/Legacy, select the second entry.
Secure Boot Prevents Startup
Official Ubuntu images generally support UEFI Secure Boot. You therefore do not need to disable Secure Boot from the outset.
However, older firmware compatibility issues or modified boot images may cause failures. First check the following:
- Confirm that you are using an official Ubuntu ISO
- Recreate the USB drive for UEFI
- Select the
UEFI:entry in the Boot Menu - Check whether a BIOS or UEFI firmware update is available
Try disabling Secure Boot only as a limited test after checking other possible causes. It is advisable to restore the original setting afterward.
The USB Drive Looks Smaller or Unusual in Windows
Writing an Ubuntu ISO can create several partitions on the USB drive. Windows File Explorer may therefore show a smaller capacity than the original, or only some of the partitions.
This can be a normal result of creating bootable USB media. To use the drive as ordinary storage again later, you need to delete the existing partitions and create a new one.
Completion Checklist
Creating the bootable USB drive is complete when all the following have been checked:
- The Ubuntu 26.04 LTS Server ISO was selected.
- The correct target USB drive was selected.
- Existing data on the USB drive was backed up.
- The Legacy BIOS or UEFI boot mode was confirmed.
- MBR was selected for Legacy BIOS.
- GPT was selected for UEFI.
- Rufus finished writing without errors.
- The USB drive was removed safely.
- The USB drive was selected in the target computer’s Boot Menu.
- The Ubuntu Server installation start screen appeared.
Precautions and Limitations
- Creating a bootable USB drive with Rufus deletes existing data on the drive.
- BIOS and Boot Menu item names vary by manufacturer.
- An older computer does not necessarily use Legacy BIOS.
- On computers supporting both UEFI and Legacy/CSM, check the currently enabled mode.
- Some defaults may vary with the Ubuntu ISO and Rufus version.
- Mismatched Legacy and UEFI settings may cause boot failure, but computers supporting multiple boot methods may be exceptions.
- The boot mode used to install Ubuntu can affect the installed system’s boot configuration. It is advisable to use the intended mode consistently from the beginning.
Next Steps
In this article, you created an Ubuntu Server installation USB drive in the following order:
Connect USB
→ Select the Ubuntu ISO in Rufus
→ Configure Legacy BIOS or UEFI settings
→ Write the ISO
→ Select USB in the Boot Menu
→ Check the Ubuntu installation screen
In the next article, you will boot the computer from the completed USB drive and continue with the tasks below.
- Previous article: Preparing a Computer for Ubuntu LTS Server Installation
- Next article: Installing Ubuntu 26.04 LTS Server
Topics for the next article:
- Start the Ubuntu Server installation screen
- Select the language and keyboard
- Configure the network
- Configure disks and storage
- Create a username and server name
- Install OpenSSH Server
- Perform the first boot after installation
- Check when to remove the installation USB drive
Writing and Verification Information
- Author: apple2ne1
- Reviewer recorded in the source Korean article: apple2ne1
- Firsthand work: based on the author’s USB creation sequence recorded in the Korean article
- Last review date recorded in the source article: July 15, 2026
- Verification method recorded in the source article: comparison of actual screens with official Ubuntu, Rufus, and Intel documentation
- Target hardware recorded in the source article: Intel NUC Kit D34010WYKH, Intel Visual BIOS 2.1.2
This English version translates the Korean article’s recorded procedure. It does not represent a separate USB creation or boot test in an English environment. Images are shared with the Korean version and may show Korean interface labels.
References and Sources
- Official Ubuntu Server Download — Ubuntu 26.04 LTS Server image — July 15, 2026
- Ubuntu 26.04 LTS Release Notes — Release information — July 15, 2026
- Official Rufus Website — Rufus downloads and features — July 15, 2026
- Official Rufus FAQ — BIOS/UEFI and Rufus configuration criteria — July 15, 2026
- Intel Core i3-4010U Specifications — Intel 64 support — July 15, 2026
- Intel NUC BIOS Update Readme —
F2BIOS Setup andF10Boot Menu — July 15, 2026 - Unable to Enter BIOS Setup with F2 on an Intel NUC — Checking a wired keyboard and USB ports — July 15, 2026