
Summary
In the previous articles, you downloaded the Ubuntu Server installation image and created a bootable USB drive with Rufus.
Now you will boot the computer from that USB drive and install Ubuntu 26.04 LTS Server on its internal disk. Ubuntu 26.04 LTS is a long-term support release. Ubuntu Server is designed primarily for server operation through a terminal and remote access rather than a graphical desktop environment.
This article walks through the installation screens in order and explains how the server name, username, and password entered during installation will be used later.
Installing Ubuntu may delete existing data on the selected disk. Identify the installation disk carefully and back up any files you need before proceeding.
Who This Article Is For
- Anyone turning an unused computer into a Linux development server
- Anyone installing Ubuntu Server on a physical disk for the first time
- Anyone who needs help configuring networking, storage, and user accounts during installation
- Anyone preparing an Ubuntu Server for SSH access from a Windows 11 PC
Before You Begin
The Server You Will Build
The computer you install here will be used for:
- Developing and testing programs
- Running React and Vite projects
- Testing backends and databases
- Running Docker containers
- Using Git and Codex CLI (other AI tools can also be used)
- Connecting remotely over SSH from a Windows 11 PC
- Checking completed projects before transferring them to a deployment server
In this article, the server is called:
project-dev-server
Using hyphens
-instead of spaces in server names makes them easier to manage.
Installation Overview
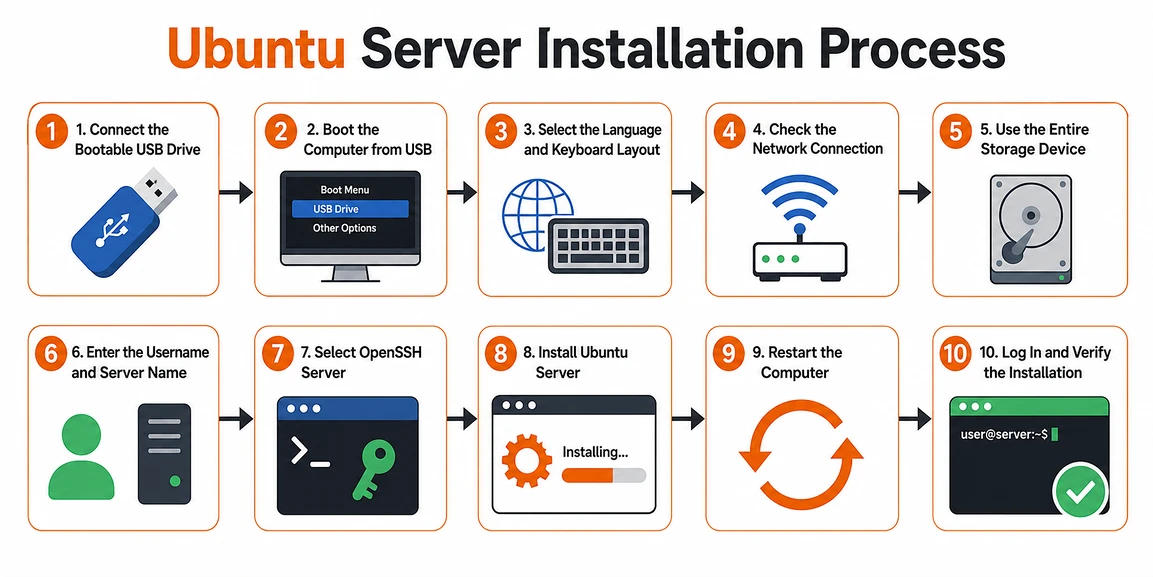
The Ubuntu Server installation follows this sequence:
Connect the bootable USB drive
→ Boot the computer from USB
→ Select the installation language and keyboard
→ Check networking
→ Configure use of the entire disk
→ Enter the username and server name
→ Select OpenSSH Server
→ Install Ubuntu Server
→ Restart
→ Log in and check the installation
What You Need
Prepare the following before starting the Ubuntu Server installation:
- An Ubuntu 26.04 LTS bootable USB drive
- The computer on which Ubuntu will be installed
- A monitor
- A keyboard
- An Ethernet cable
- The hard disk or SSD to use for installation
- A username and password to enter during installation
Ubuntu’s official basic installation guide lists recommended minimums of 2 GB of memory and 5 GB of storage for a Server installation. The Ubuntu 26.04 LTS release notes give a starting baseline of 1.5 GB of RAM and 4 GB of storage. For practical server operation, however, it is advisable to prepare at least 25 GB of storage.
In this configuration, Ubuntu will use the entire disk of a dedicated server computer.
Precautions Before Installation
This installation method may delete the existing operating system and files on the selected disk.
Make sure you check the following:
- Have you backed up the files you need to another storage device?
- Have you correctly identified the disk on which Ubuntu will be installed?
- Are any other disks containing important data connected?
- Have you distinguished the bootable USB drive from the installation disk?
For a first installation, temporarily disconnecting secondary disks that will not receive Ubuntu can help reduce mistakes.
Verification Environment
- Installation target: Intel NUC Kit D34010WYKH
- Processor: Intel Core i3-4010U
- BIOS: Intel Visual BIOS 2.1.2
- Installation image: Ubuntu 26.04 LTS Server, Intel or AMD 64-bit architecture
- Installation method: entire-disk installation from a bootable USB drive
- Network: wired LAN using the router’s DHCP service
Instructions
1. Connect the Bootable USB Drive
Connect the Ubuntu 26.04 LTS bootable USB drive created in Creating an Ubuntu 26.04 LTS Bootable USB Drive with Rufus to a USB port on the target computer.
Where possible, connect directly to a USB port on the back of the computer. On older computers, a USB 2.0 port may be recognized more reliably during startup than a USB 3.0 port.
2. Boot the Computer from USB
For manufacturer-specific BIOS Setup and one-time Boot Menu keys, see the earlier article, Preparing a Computer for Ubuntu LTS Server Installation.
Immediately after turning on the computer, repeatedly press the appropriate boot-menu key for the manufacturer.
Common keys include:
F2
F10
F11
F12
Esc
Delete
Keys vary by computer manufacturer and motherboard. Check the startup screen for labels such as:
Boot Menu
Boot Options
BIOS Setup
UEFI Setup
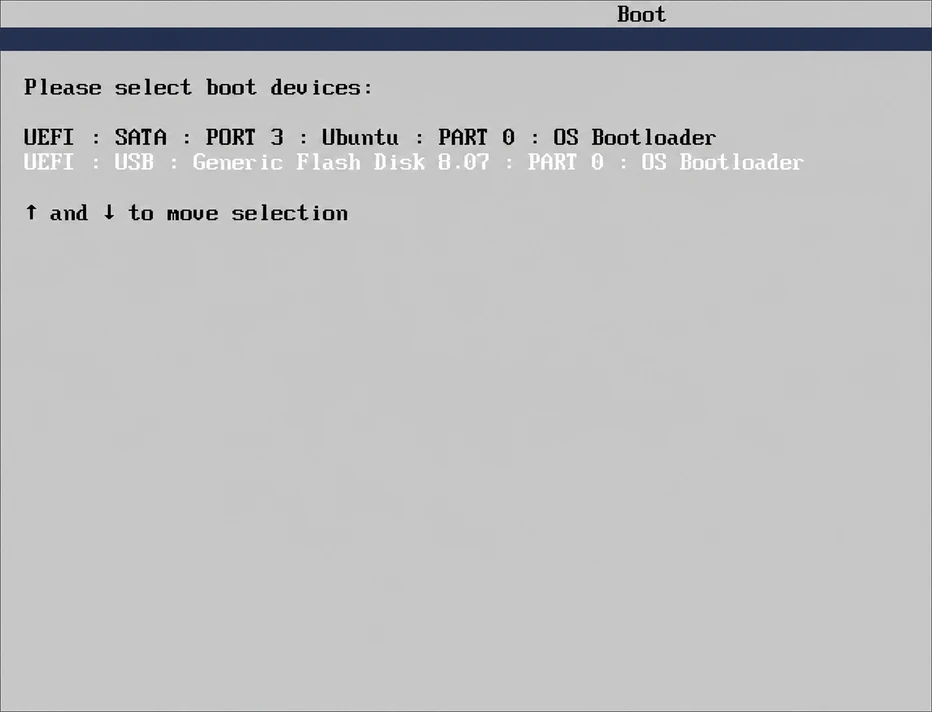
When the boot menu appears, select the Ubuntu installation USB drive.
If the USB drive was created for UEFI, it may appear as:
UEFI: USB name
For Legacy BIOS, only the USB manufacturer’s name or device name may appear.
If the USB Boot Entry Is Missing
If the USB drive does not appear in the boot menu, check the following:
- Connect the USB drive to another port.
- Turn the computer off completely, then turn it on again.
- Check that USB Boot is enabled in BIOS.
- Put USB first in the BIOS boot priority.
- Check that the UEFI or Legacy settings chosen in Rufus match the computer’s boot mode.
- Recreate the bootable USB drive with Rufus if necessary.
3. Start the Ubuntu Server Installer
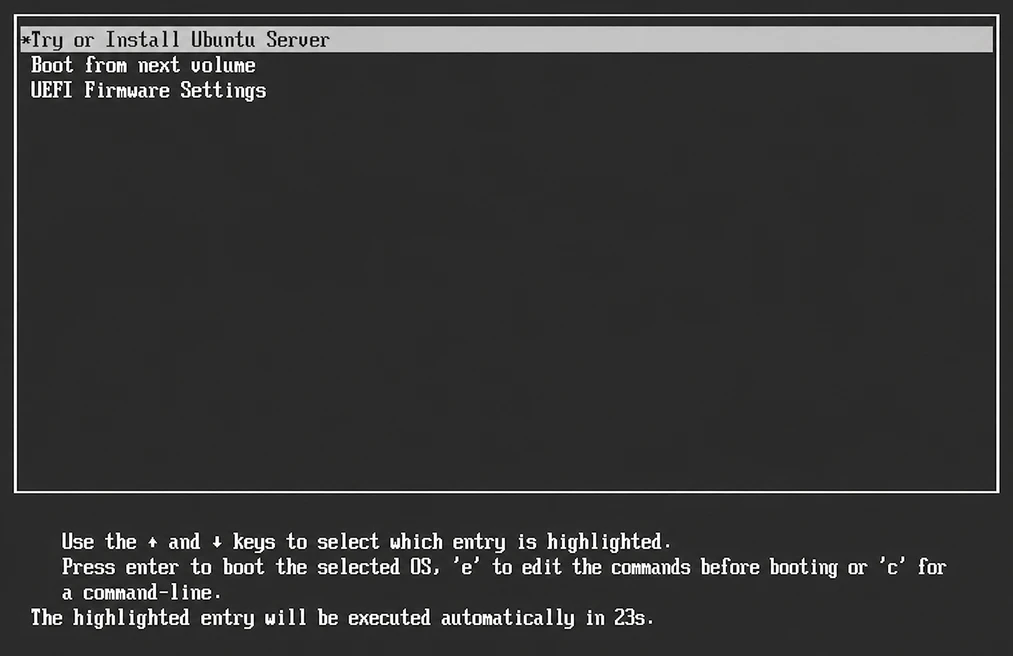
If USB boot succeeds, the Ubuntu installation menu appears.
Select an entry similar to:
Try or Install Ubuntu Server
The installer may also start automatically when the countdown message at the bottom reads, for example, The highlighted entry will be executed automatically in 23s.
Use the arrow keys to select the entry and press Enter.
4. Select the Installation Language
Choose the language to use during installation.
To make it easier for beginners to search online documentation and error messages, the following setting is recommended:
English
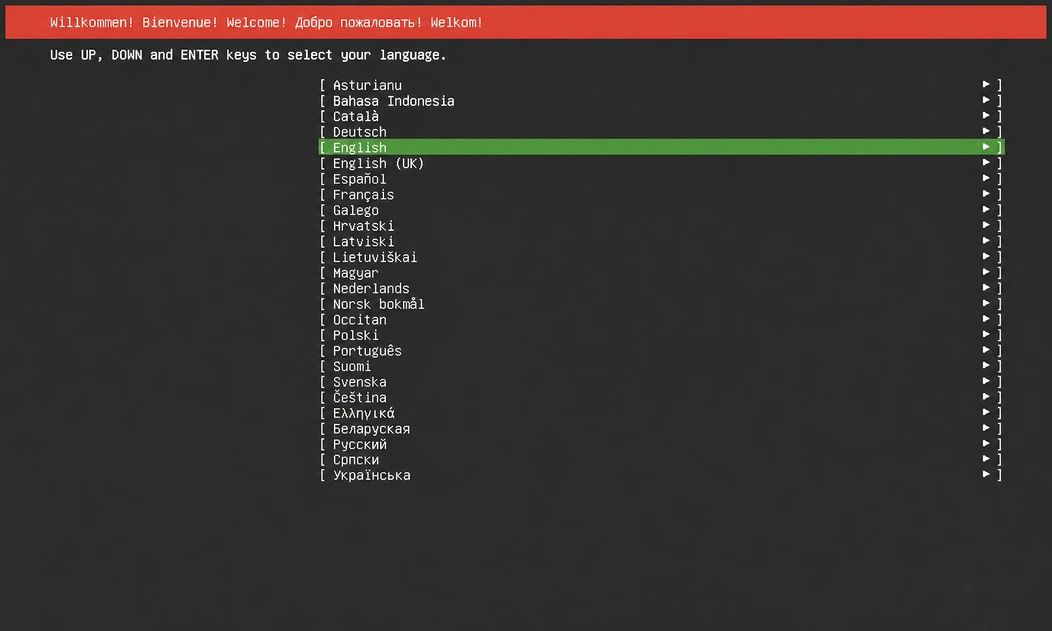
Choosing English for installation does not prevent you from adding Korean input or display support later.
This article uses the English interface so that installation screens and commands are easier to compare.
5. Check for an Installer Update
If a newer installer version is available, a screen may ask whether to update it.
With a working Internet connection, you can update the installer before continuing.
If the connection is unstable, or you prefer to follow the current screens, you may continue without updating.
Screen layouts and item names may vary slightly with the specific Ubuntu installation image version.
6. Configure the Keyboard
Select your keyboard layout on the keyboard configuration screen.
A typical US keyboard uses:
Layout: English (US)
Variant: English (US)
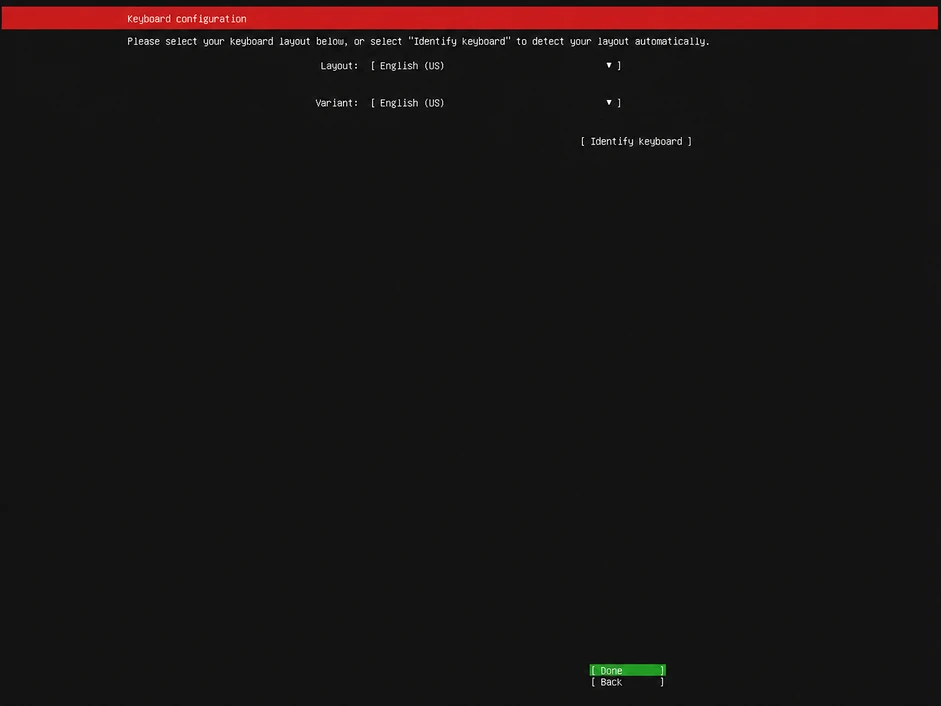
Most Korean keyboards can also use English (US) for their basic English key layout.
After selecting the layout, use the test field to check that these symbols are entered correctly:
@
:
/
-
_
A mismatched keyboard layout can cause login problems when you later enter passwords or terminal commands.
7. Select the Installation Type
If an installation-type screen appears, select a standard server installation.
You may see options such as:
Ubuntu Server
Ubuntu Server (minimized)
For a first installation, the standard option is recommended:
Ubuntu Server
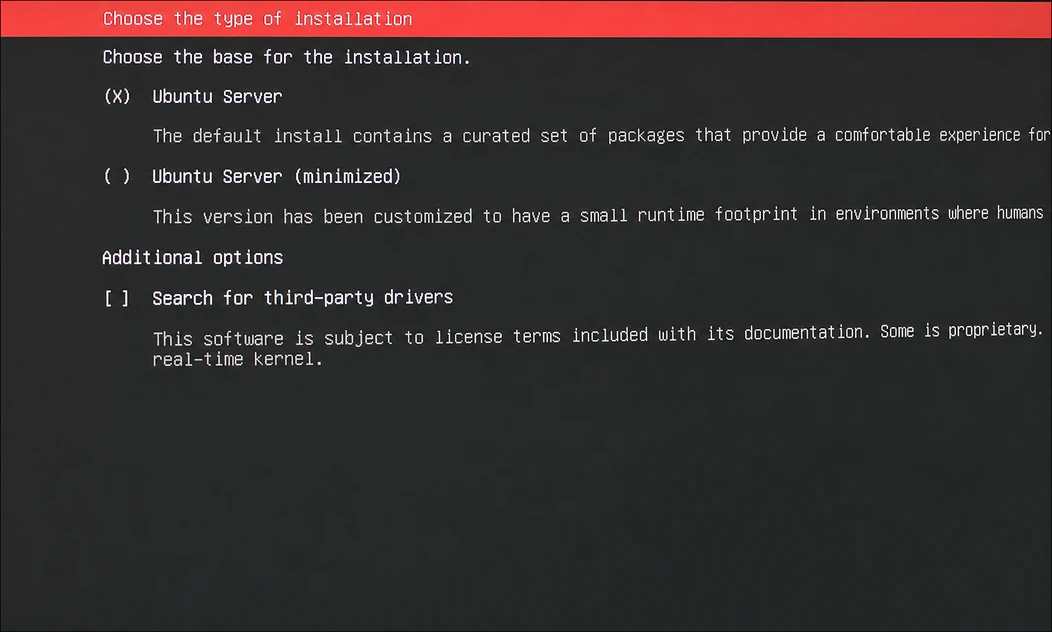
A minimized installation includes fewer default packages. Beginners often need to install more tools afterward, so the standard installation is more convenient.
8. Check the Network Connection
During installation, Ubuntu Server automatically detects connected network devices.
If an Ethernet cable is connected and the router’s DHCP service is enabled, an IP address appears automatically, as shown below.
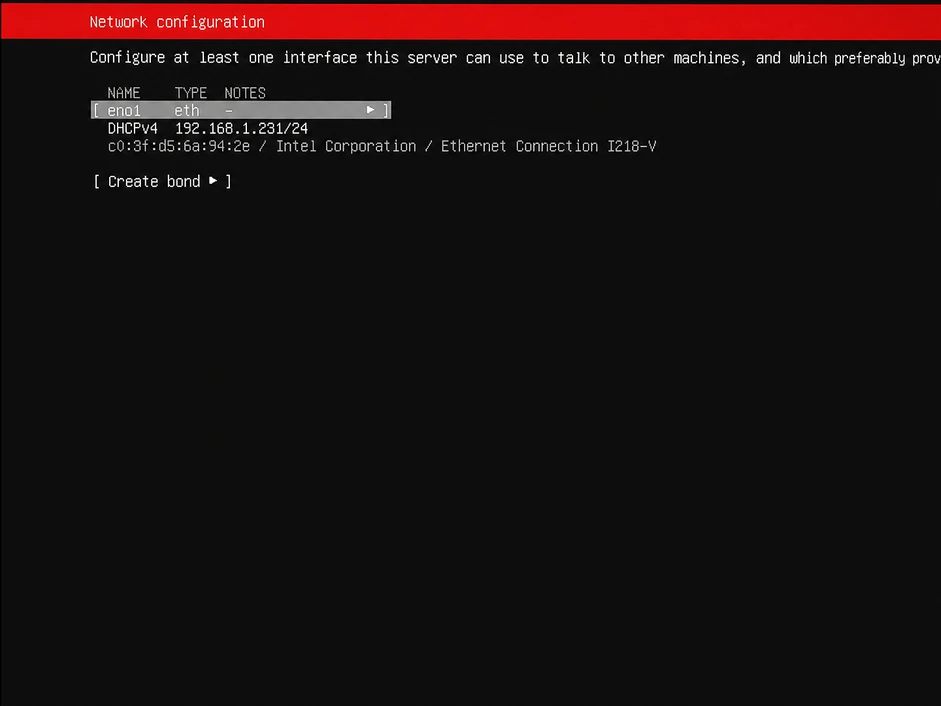
In the installation recorded here, the address was:
192.168.1.231
Another network might use an address such as:
192.168.0.xxx
For now, continue the installation using the automatically assigned address.
A fixed IP address will be configured separately after installation, once the server’s network arrangement has been checked.
If the Ethernet cable was connected late and Ubuntu did not detect an address automatically, select the Network Interface and recheck its settings.
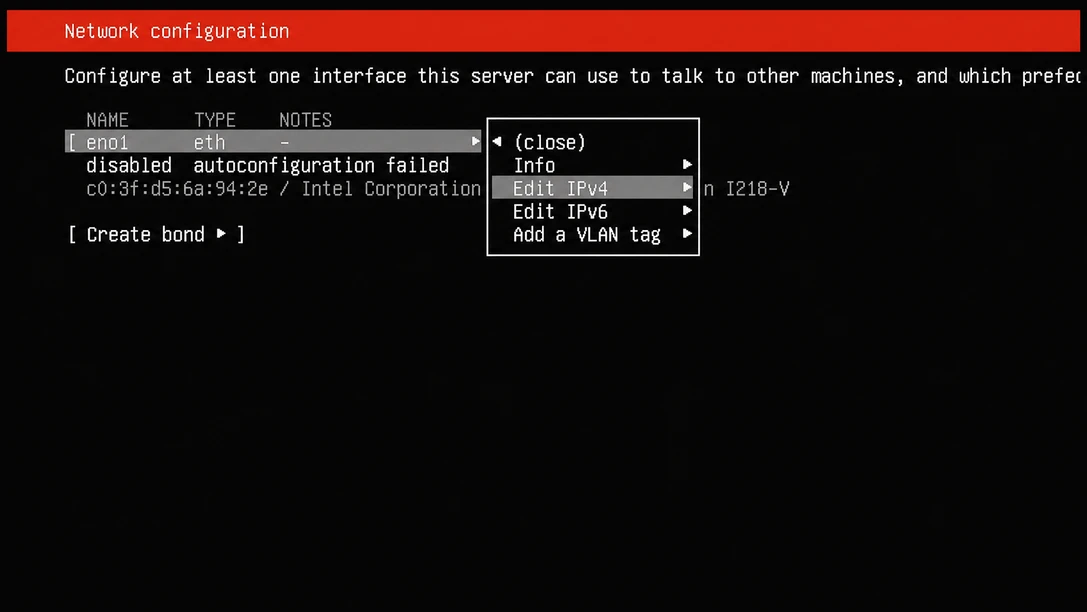
Check that IPv4 Method is set to Automatic (DHCP), then save. Back on the network configuration screen, check that an actual IP address appears.
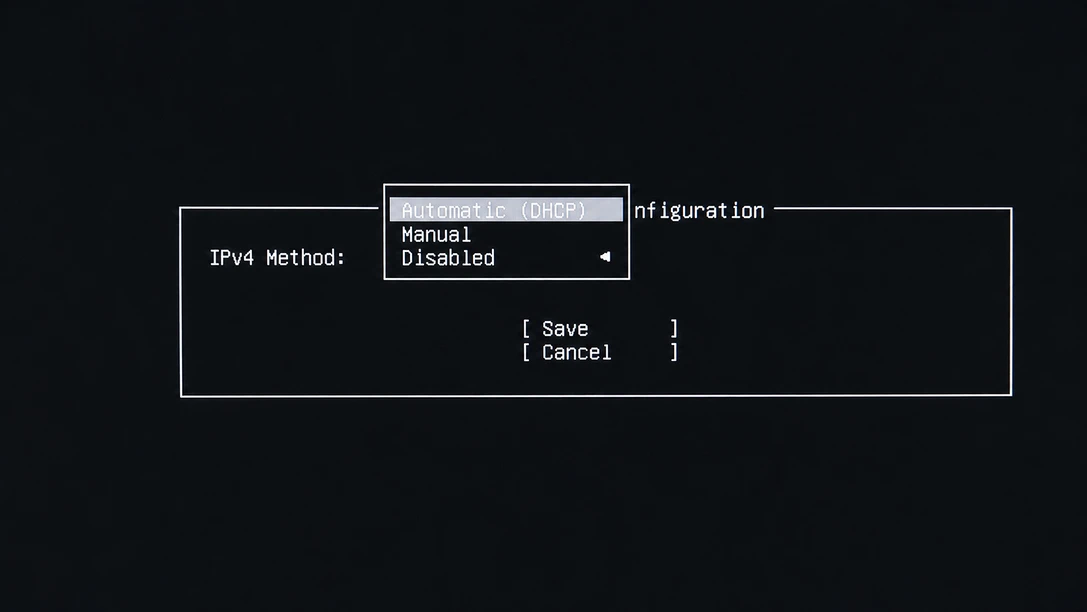
If the Network Is Not Connected
If no IP address appears, check:
- Is the Ethernet cable connected?
- Is the port indicator on the router or switch lit?
- Have you tried another LAN port?
- Has the computer’s network device been recognized correctly?
- Are you connected through wired LAN rather than Wi-Fi?
Where possible, use a wired network for a server to improve connection stability and simplify management.
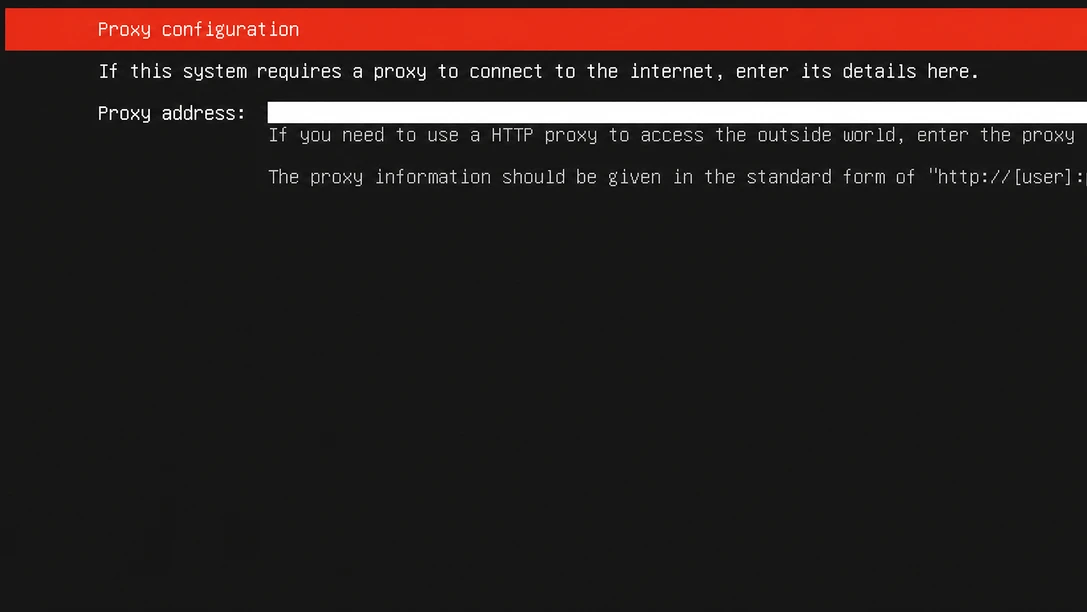
9. Configure a Proxy
A screen may ask for a proxy address.
On a typical home network that does not use a company or institutional proxy server, leave this empty and continue.
Proxy address: leave blank
10. Check the Ubuntu Archive Mirror
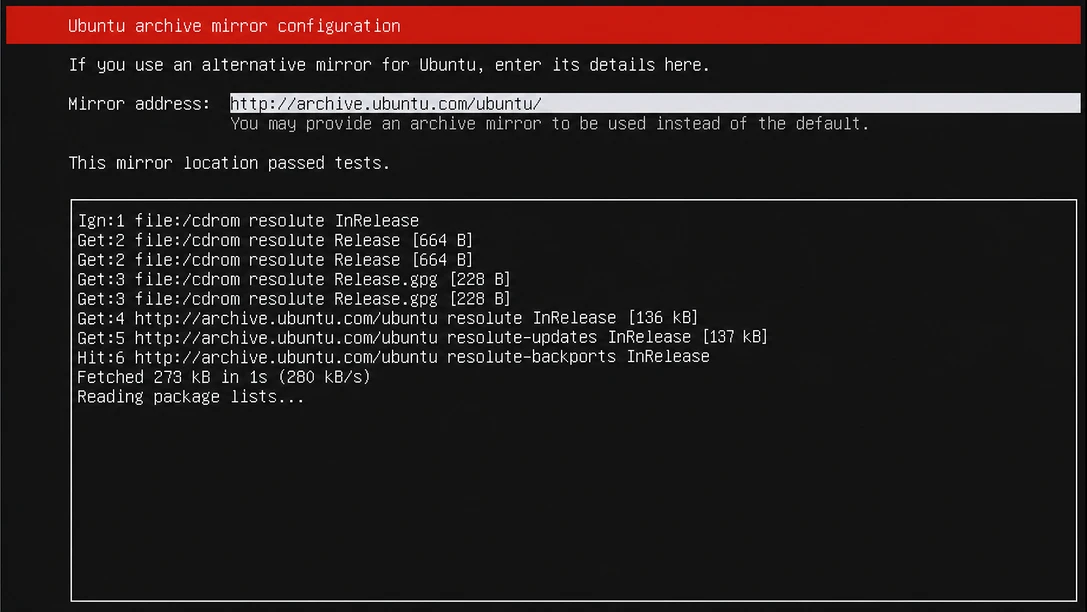
This screen checks the server address used to download Ubuntu packages.
If the default address passes its check, continue without changing it.
An automatically suggested mirror address can generally be used as provided.
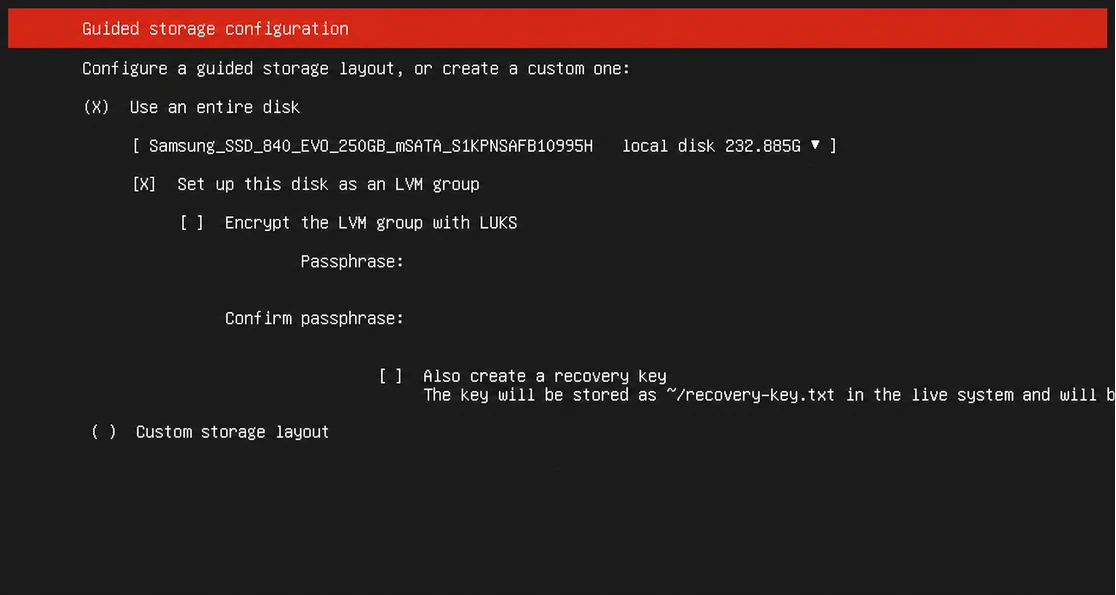
11. Configure Use of the Entire Disk
This computer will be dedicated to Ubuntu, so the installation will use the entire target disk.
On the storage configuration screen, select an option similar to:
Use an entire disk
Then select the SSD or hard disk on which to install Ubuntu.
For example:
Samsung SSD 1TB
The disk used here was:
Samsung SSD 840 EVO 250GB
Always Verify the Installation Disk
Before selecting a disk, check the following to ensure you install in the intended location:
- Disk manufacturer
- Total capacity
- Whether it is an SSD or HDD
- Whether you have confused it with the USB installation drive
- Whether it contains data you need
For example, a 16 GB installation USB drive and a 1 TB target SSD can be distinguished by capacity.
16GB USB: installation media
1TB SSD: Ubuntu installation target
LVM Settings
The installer may offer an LVM option:
Set up this disk as an LVM group
LVM manages storage logically, making it easier to extend or reconfigure volumes later.
For a first server installation using the entire disk for one operating system, you can retain the installer’s default selection.
Disk encryption may require entering a password manually each time the server restarts. Consider the intended use carefully before enabling it on a development server operated remotely.
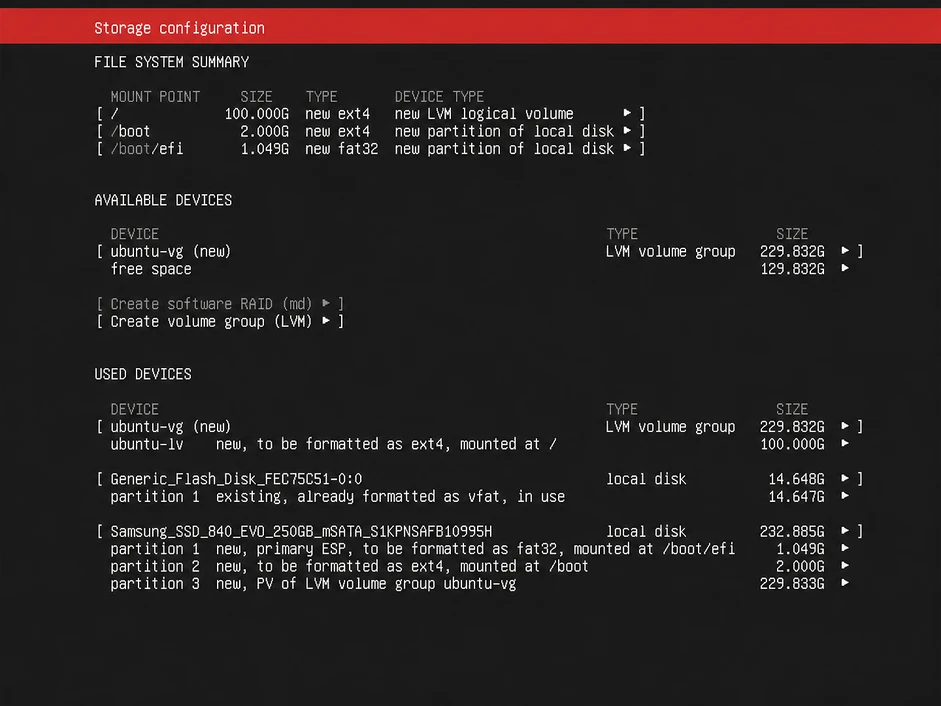
12. Review the Partition Layout
Review the partition layout created automatically by the installer.
You may see areas such as:
- An EFI or BIOS boot area
/boot/, where the Ubuntu system is installed- LVM volumes
If the layout is correct, continue with:
Done
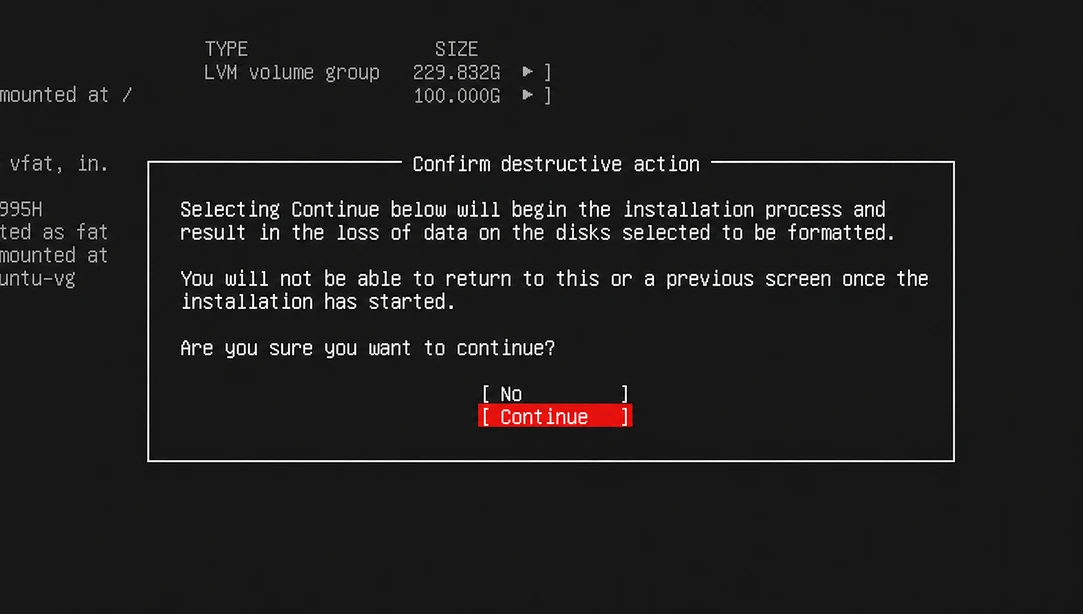
When a warning says the disk’s existing contents will be deleted, check the target disk again before confirming:
Continue
Existing data on the selected disk may be deleted after this step. Always check the disk again.
After completing the partition layout, a final confirmation screen warns that data on the selected disk will be deleted. Before selecting Continue, check again that the disk model and capacity match the intended target.
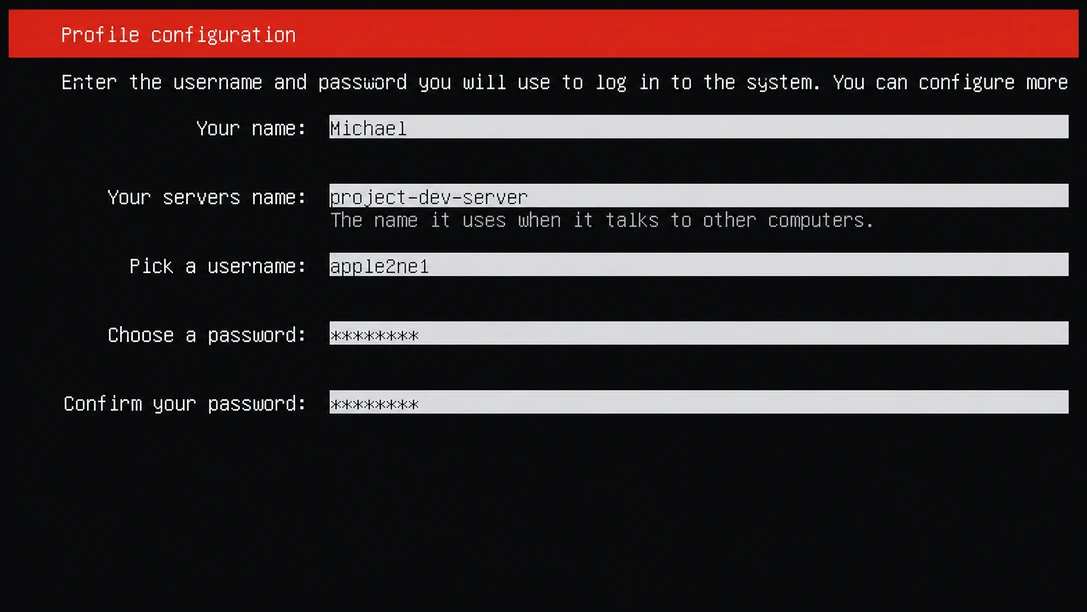
13. Configure the Server Name and User Account
This is a particularly important step in the Ubuntu Server installation.
The following fields appear:
Your name
Your server's name
Pick a username
Choose a password
Confirm your password
Each field has a different purpose.
Your name
This is a display name used to identify the user.
For example:
Michael
It is mainly a descriptive name. The account name used to log in at a terminal is the one entered under Pick a username below.
Your server’s name
This is the server name, or hostname, that identifies the computer on the network.
Use this name for the server in this article:
project-dev-server
When managing several servers on the same network, their names can identify their roles.
For example:
project-dev-server
project-deploy-server
project-backup-server
Recommended naming practices are:
- Use lowercase English letters
- Numbers are allowed
- Separate words with hyphens
- Do not use spaces
- Choose a name that indicates the server’s role
Pick a username
This is the actual account name used to log in to Ubuntu.
For example:
apple2ne1
After installation, log in at the server’s console like this:
login: apple2ne1
Use the same username when connecting over SSH from a Windows 11 PC. SSH commands use the form username@server-address:
ssh apple2ne1@project-dev-server
Here, apple2ne1 is the login username and project-dev-server is the name of the server to connect to. This command works when the Windows management PC and Ubuntu Server are on the same network and Windows can resolve project-dev-server to the server’s address.
If connecting by hostname does not work, use the server’s IP address:
ssh apple2ne1@192.168.1.xxx
Do not enter 192.168.1.xxx literally. Replace it with the actual IP address checked on the server. In this installation, DHCP assigned 192.168.1.231, so the command is:
ssh apple2ne1@192.168.1.231
In other words, put the username selected in Pick a username before @, and a reachable hostname or actual server IP address after it.
After logging in to Ubuntu, the terminal prompt generally displays username@server-name:
apple2ne1@project-dev-server:~$
The apple2ne1 before @ is the username selected in Pick a username. The project-dev-server after @ is the hostname entered in Your server's name. This prompt tells you which account and server you are currently using.
The first user created by the Ubuntu installer generally belongs to the sudo group and can perform tasks requiring administrator privileges.
The sudo group permits a regular user to run commands with administrator privileges when needed. Group members still perform ordinary work with regular user privileges; prefixing a command with sudo runs that command with administrator privileges.
For example, when installing packages or changing system settings:
sudo apt update
Running sudo generally prompts for the current user’s password. Only users trusted to perform administrative work should belong to the sudo group. You do not need to log in with administrator privileges for everyday tasks.
Choose a short, memorable username that you intend to keep using.
Choose a password
This is the login password for the user account created above.
It is used when:
- Logging in directly at the server
- Connecting with SSH password authentication
- Running
sudocommands - Changing settings that require administrator privileges
Characters may not appear on screen as you enter the password. This does not mean input is failing; it is hidden for security.
Consider the following when choosing a password:
- Sufficient length
- Uppercase and lowercase letters
- Numbers
- Special characters
- A password not used on other websites
It is advisable to record the username, server name, and password separately before installation.
Example for This Installation
Your name: Michael
Your server's name: project-dev-server
Pick a username: apple2ne1
Choose a password: a strong password not disclosed in screenshots or documentation
Make sure the actual password is not visible in images published on the blog.
14. Configure Ubuntu Pro
A screen may ask whether to subscribe to Ubuntu Pro.
When setting up a personal development server for the first time, you can skip linking Ubuntu Pro for now:
Skip for now
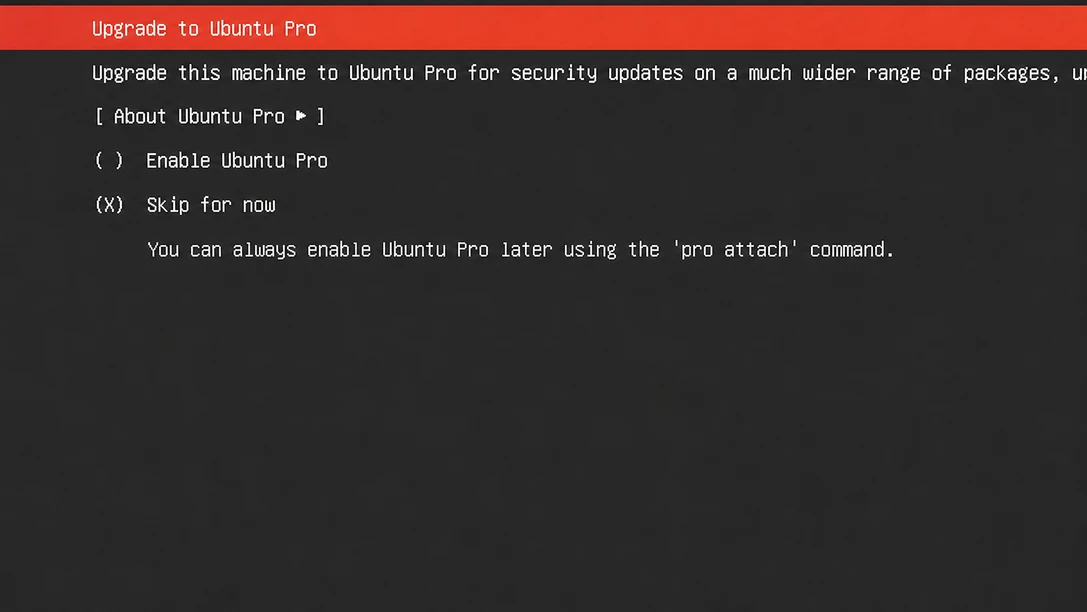
You can configure it later if needed, after completing the Ubuntu installation.
15. Install OpenSSH Server
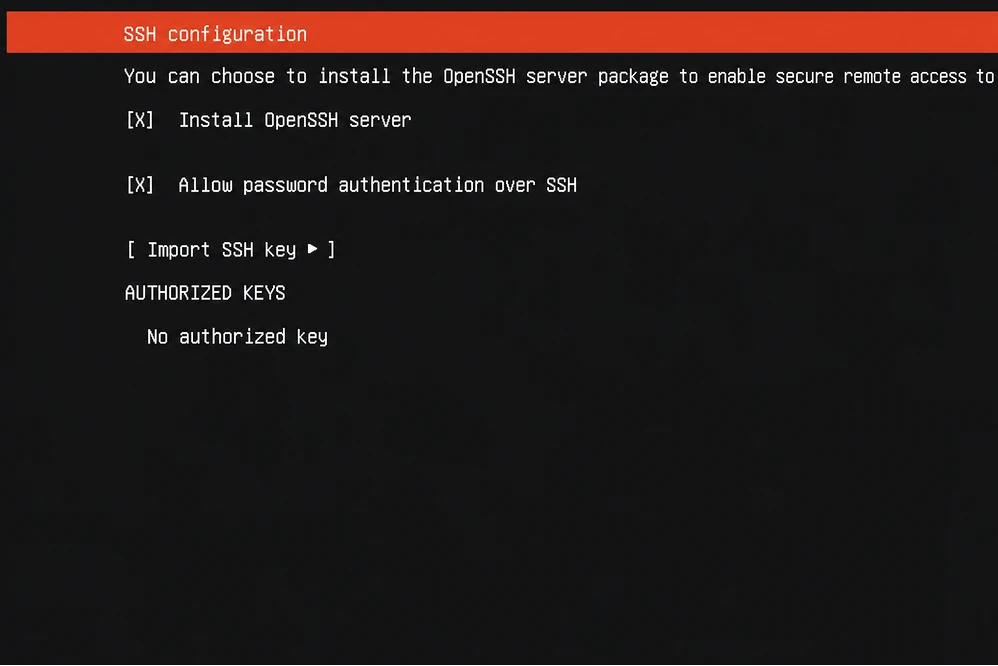
Next, choose whether to install OpenSSH Server:
Install OpenSSH server
Select this option because this server will be accessed remotely from a Windows 11 PC after installation.
OpenSSH Server allows another computer to access the server’s terminal through an encrypted SSH connection. Ubuntu’s official documentation also explains how to install and use openssh-server for remote access.
Press the space bar to select the option, then continue.
For example:
[X] Install OpenSSH server
Importing SSH Keys
An option to import SSH keys from GitHub or Launchpad may appear.
If you have not prepared an SSH public key yet, you may continue without importing one.
After installation, you will create an SSH key on the Windows 11 PC and register it on the server.
16. Select Additional Server Software
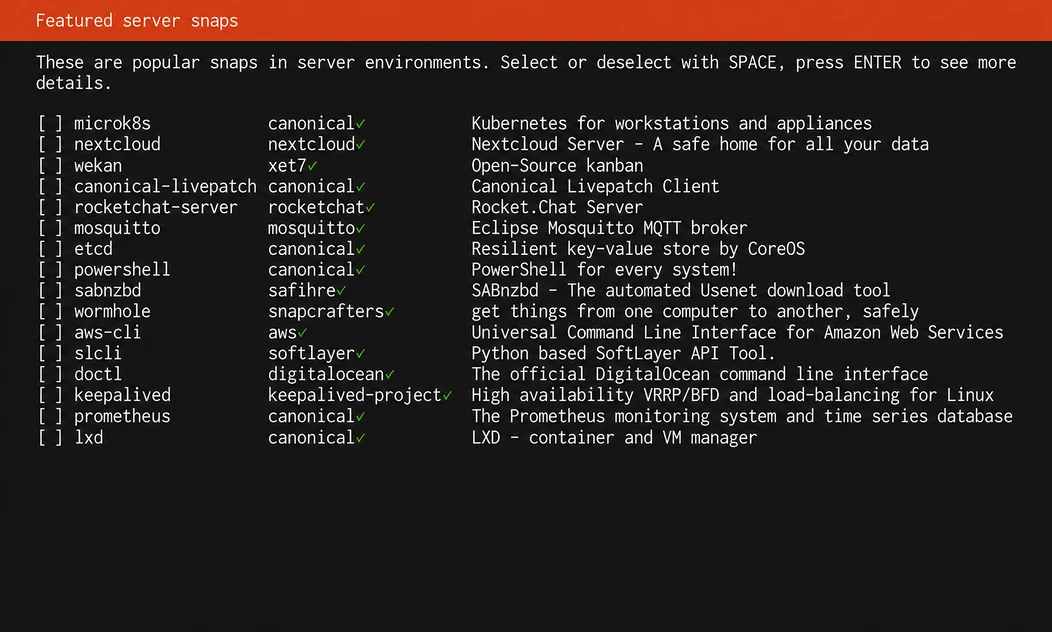
The installer may display a selection of server applications, such as:
- Docker
- Nextcloud
- PostgreSQL
- Other server snaps
At this stage, select none of them and install only the basic Ubuntu Server system.
It is easier to manage Docker and development tools by installing them separately after server installation, checking their versions and installation methods as you go.
Select nothing, then choose Done
17. Wait for Ubuntu Server to Install
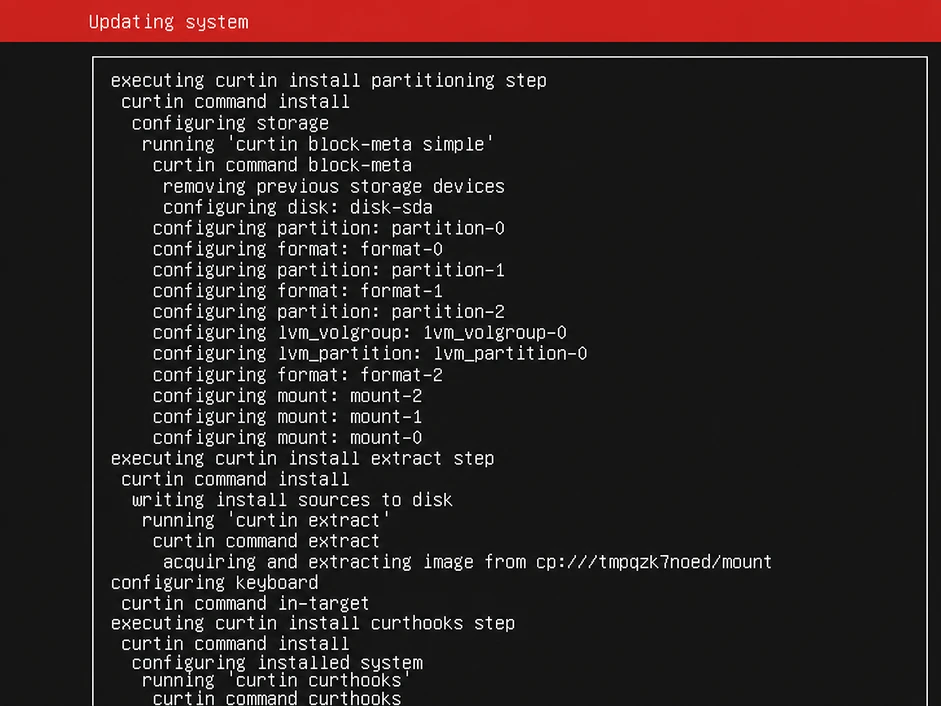
Ubuntu Server is now installed on the selected disk.
During installation, the following tasks take place:
- Creating disk partitions
- Installing the base Ubuntu system
- Creating the user account
- Configuring networking
- Installing OpenSSH Server
- Installing the bootloader
- Applying security updates
Installation time varies with the Internet connection and computer performance.
18. Restart After Installation
When installation finishes, this option appears:
Reboot Now
Select it to restart.
When prompted to remove the installation USB drive, unplug it and press Enter.
For example:
Please remove the installation medium, then press ENTER
If you leave the USB drive connected, the computer may boot into the Ubuntu installer again.
19. Log In to Ubuntu Server for the First Time
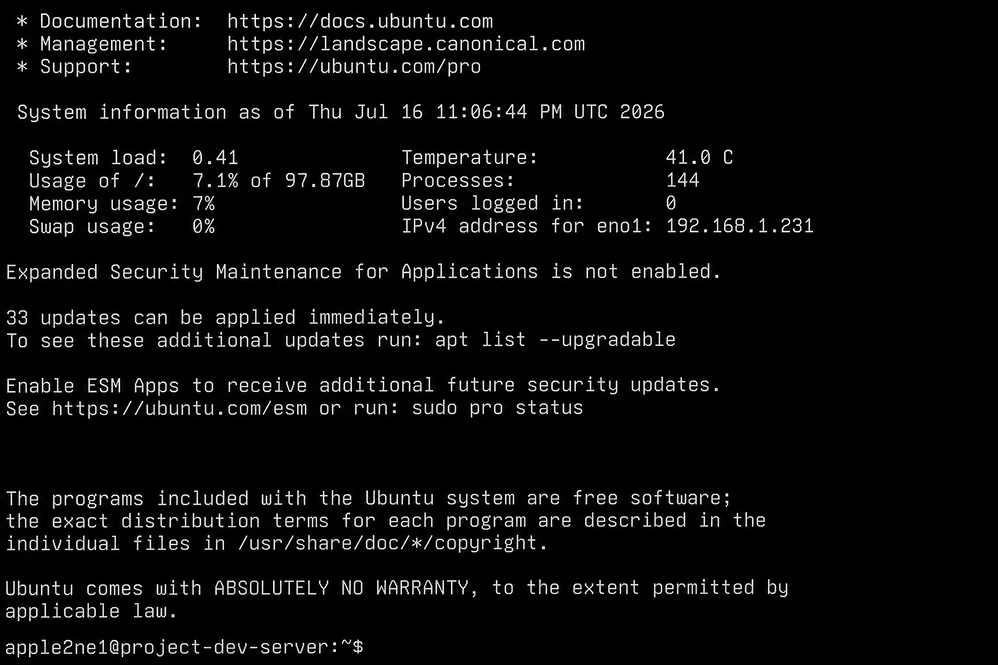
After the restart, a login prompt appears on a black terminal screen.
For example:
project-dev-server login:
Enter the username created during installation:
apple2ne1
Then enter the password.
It is normal for neither characters nor asterisks to appear while you type the password.
After a successful login, a prompt similar to this appears:
apple2ne1@project-dev-server:~$
You can read it as follows:
apple2ne1
The username

@
Separates the username from the server name

project-dev-server
The server currently connected to

~
The current user's home directory

$
Logged in with regular user privileges
20. Check the Server Name
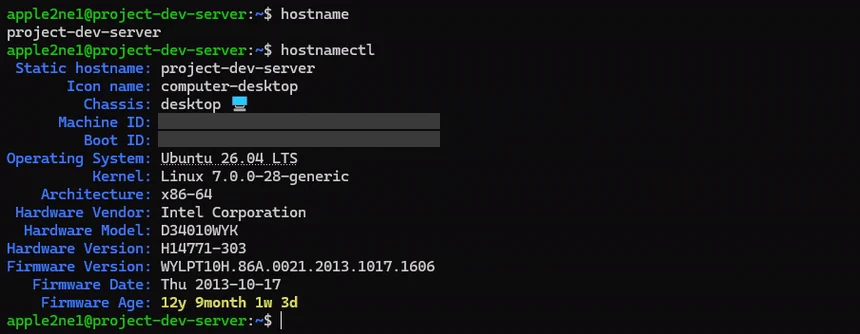
After logging in, enter:
hostname
If configured correctly, the output is:
project-dev-server
For more detailed system information, use:
hostnamectl
The main fields to check are:
Static hostname
Operating System
Kernel
Architecture
21. Check the Ubuntu Version
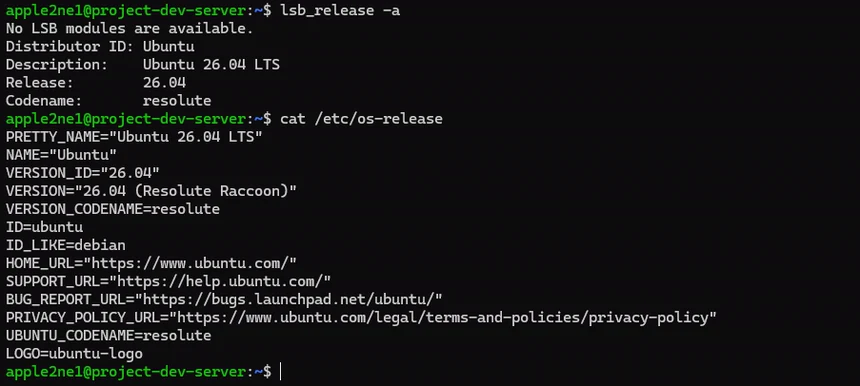
Check the installed Ubuntu version:
lsb_release -a
Alternatively:
cat /etc/os-release
Check that information for Ubuntu 26.04 LTS appears.
22. Check the Server’s IP Address
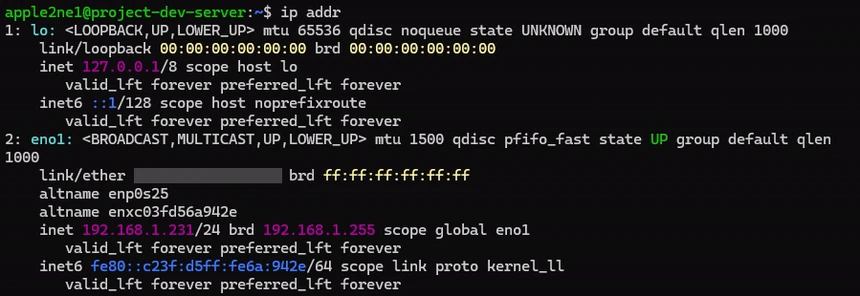
You need the server’s IP address to connect from the Windows 11 PC.
Enter:
ip addr
For a simpler display, use:
hostname -I
192.168.1.231
This address will be used when connecting to the server over SSH from Windows 11 in the next article.
The current address may be assigned automatically by the router through DHCP. A static IP address or DHCP reservation will be configured later.
23. Check the Internet Connection
Use this command to check connectivity:
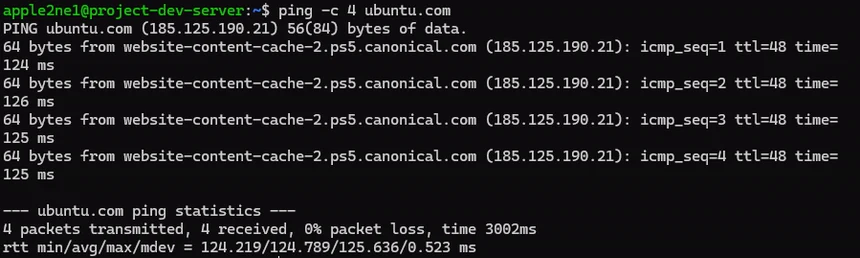
ping -c 4 ubuntu.com
If replies arrive normally, Internet connectivity and DNS resolution are working.
The command exits automatically when the test finishes.
24. Update Package Lists and the System
Immediately after installation, update the package lists and installed software.
sudo apt update
Apply available package upgrades:
sudo apt upgrade -y
The -y option automatically agrees to the package installation confirmation prompt. Omit -y if you want to review the package changes yourself.
The first time you run sudo, it asks for the current user’s password:
[sudo] password for apple2ne1:
Characters are not displayed as you type the password.
If a message says a restart is required after the update, run:
sudo reboot
25. Check the SSH Service
If you selected OpenSSH Server during installation, check the service with:
sudo systemctl status ssh
A normally running service shows:
active (running)
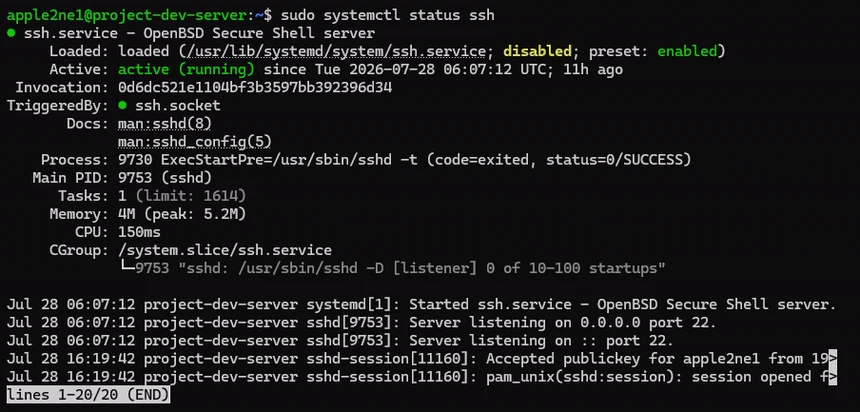
To leave the status screen, press:
q
To start SSH and enable it at boot, you can use:
sudo systemctl enable --now ssh
26. Keep the Installation USB Drive
After installing Ubuntu, it is advisable to keep the bootable USB drive rather than immediately formatting it.
You can reuse it for:
- Reinstalling Ubuntu
- Recovering the server
- Checking storage problems
- Troubleshooting boot problems
- Installing Ubuntu on another computer
Label the outside of the drive so it is easy to identify:
Ubuntu Server 26.04 LTS Installer
Completion Checklist
Check that all of the following are working:
- ☐ The computer booted from its internal disk after the USB drive was removed.
- ☐ You can log in with your username.
- ☐ The server name is shown as
project-dev-server. - ☐ Ubuntu 26.04 LTS is installed.
- ☐ The wired network is connected.
- ☐ You have checked the server’s IP address.
- ☐ Internet connectivity is working.
- ☐ System updates are complete.
- ☐ The SSH service is
active (running). - ☐ The username and password have been recorded securely.
Common Problems
The Installer Appears Again After Restarting
The installation USB drive is still connected, or USB is first in the boot order.
To resolve this:
- Turn off the computer.
- Remove the installation USB drive.
- Turn on the computer again.
- If necessary, set the disk containing Ubuntu as the first boot device in BIOS.
The Login Password Seems Not to Be Entered
Linux terminals do not display characters or asterisks when you enter a password.
Type the password accurately and press Enter.
You Cannot Log In with Your Username
Check the following:
- Did you enter the
username, rather thanYour name? - Did you use the correct uppercase and lowercase letters?
- Has the keyboard layout changed?
- Are special characters in the password entered as expected?
The Server Has No IP Address
Check network devices with:
ip addr
After checking the Ethernet cable and router port, inspect the network interface and Netplan status first:
networkctl status
sudo netplan status
Restart the following service only after confirming that this installation uses systemd-networkd as its network renderer:
sudo systemctl restart systemd-networkd
You can also restart the computer and check again:
sudo reboot
The SSH Service Is Not Installed
If you did not select OpenSSH Server during installation, you can install it after logging in:
sudo apt update
sudo apt install openssh-server -y
Start the service:
sudo systemctl enable --now ssh
Check its status:
sudo systemctl status ssh
Important Information Configured in This Article
The information entered during Ubuntu Server installation will continue to be used.
| Item | Example | Purpose |
|---|---|---|
| Server role | Development server | Program development and testing |
| Server name | project-dev-server |
Identifies the server on the network |
| Username | apple2ne1 |
Used for login and SSH access |
| Password | Set by you | Login and sudo authentication |
| Network | Wired LAN | Connects the server to other computers |
| Storage | Use the entire disk | Dedicates the disk to Ubuntu |
| SSH | OpenSSH Server installed | Remote access from a Windows PC |
You will continue using this information when configuring SSH, a fixed IP address, Docker, deployment automation, and other tools.
Next Steps
Ubuntu 26.04 LTS Server is now installed on the older computer, which will be used under this name:
project-dev-server
So far, you have logged in using a monitor and keyboard connected directly to the server. Sitting in front of the server to enter commands every time you need to work is inconvenient.
The next article explains how to connect over SSH from a Windows 11 PC on the same network to project-dev-server.
- Previous article: Creating an Ubuntu 26.04 LTS Bootable USB Drive with Rufus
- Next article: Link to be added later.
Topics for the next article:
- Check that the computers are on the same network and identify the server’s IP address
- Use
sudoand basic Linux commands at the server console - Make the first SSH connection from Windows PowerShell with a username and password
- Generate an SSH public key, check its fingerprint, and register it in
authorized_keys - Check the host key fingerprint and register it in
known_hosts - Configure an alias in SSH
configfor connecting - Fix the server’s IP address using a DHCP reservation or Netplan
- Configure the UFW firewall and check SSH connection errors
Writing and Verification Information
- Author: apple2ne1
- Reviewer recorded in the source Korean article: apple2ne1
- Firsthand work: based on the author’s Ubuntu Server installation sequence recorded in the Korean article
- Last review date recorded in the source article: July 29, 2026
- Verification method recorded in the source article: comparison of official Ubuntu documentation with the actual installation process and command output
- Target hardware recorded in the source article: Intel NUC Kit D34010WYKH, Intel Visual BIOS 2.1.2
This English version translates the Korean article’s recorded procedure. It does not represent a separate Ubuntu installation or command verification in an English environment. Images are shared with the Korean version.
References and Sources
- Ubuntu 26.04 LTS Release Notes — Ubuntu 26.04 LTS release information and minimum Server requirements — July 16, 2026
- Ubuntu Server Basic Installation — Installation preparation, Boot Menu, storage, accounts, and completion — July 16, 2026
- Ubuntu Server System Requirements — Minimum and recommended RAM and storage — July 16, 2026