
Summary
To install Ubuntu Server on an unused computer, first prepare the Ubuntu 26.04 LTS ISO and Rufus, and check whether the target computer boots using Legacy BIOS or UEFI. This article follows the sequence I used to prepare the installation files and check the Rufus settings and USB boot procedure for the computer’s boot mode.
This article covers preparation up to, but not including, writing the Ubuntu image to a USB drive with Rufus.
Who This Article Is For
- Anyone who wants to use an unused desktop or laptop as a personal server
- Anyone preparing an Ubuntu Server installation USB drive on Windows
- Anyone deciding which Rufus settings to use for Legacy BIOS or UEFI
- Anyone checking BIOS or Boot Menu settings before booting from an installation USB drive
Before You Begin
- Preparation: back up any files you need from the USB drive to another storage device
- Estimated time: varies with your Internet connection and computer environment
- Required devices: a Windows computer, the computer on which Ubuntu Server will be installed, and a USB flash drive
- Required software: the Ubuntu 26.04 LTS Server ISO and Rufus
- Required connection: Internet access to download the ISO and Rufus
Ubuntu’s official download page lists the Ubuntu 26.04 LTS Server image for Intel or AMD 64-bit computers as approximately 3 GB. A USB drive with a capacity of at least 8 GB is recommended.
Creating a bootable USB drive with Rufus deletes all existing data on the selected USB drive. Copy important files elsewhere before you begin.
Verification Environment
- Download and USB preparation environment: a Windows computer
- Installation target: Intel NUC Kit D34010WYKH
- Processor: Intel Core i3-4010U
- BIOS: Intel Visual BIOS 2.1.2
- Ubuntu: 26.04 LTS Server, Intel or AMD 64-bit architecture
- Rufus: Portable executable
- Test date recorded in the source article: July 14, 2026
The target computer’s model and BIOS were recorded from its physical label and BIOS screen. The D34010WYKH has an Intel Core i3-4010U processor that supports 64-bit instructions, so it uses Ubuntu’s amd64 image.
BIOS menu names and entry keys vary by manufacturer and model. The screens and options shown here may not be identical on every computer.
Instructions
1. Download the Ubuntu 26.04 LTS Server ISO
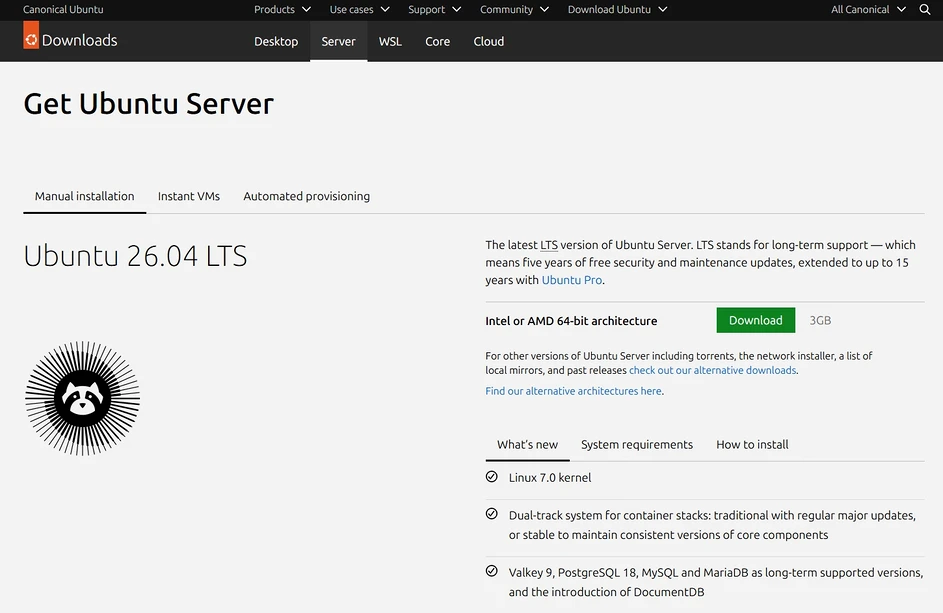
First, download the ISO file from the official Ubuntu Server page.
- Download: https://ubuntu.com/download/server
Ubuntu Server and Desktop: What Is the Difference?
Ubuntu provides Server and Desktop images for different uses.
Ubuntu Server: an installation image for running a computer as a server; it does not install a graphical user interface by default.Ubuntu Desktop: suitable for using a graphical interface like a regular PC, or for trying Ubuntu first.
For this procedure, select:
- Ubuntu 26.04 LTS
- Ubuntu Server
- Intel or AMD 64-bit architecture
2. Why Choose the Intel or AMD 64-bit Image?
Most Intel or AMD 64-bit PCs use an amd64 or x86-64 image. Here, AMD 64-bit does not mean the image is exclusively for AMD processors. Ubuntu’s official release page also directs users of AMD64- or EM64T-based computers to the 64-bit PC Server image.
The ARM 64-bit image is for ARM devices, such as servers or development boards with ARM processors. If you are unsure of the target computer’s CPU architecture, check its manufacturer’s specifications first.
Check the Downloaded ISO File
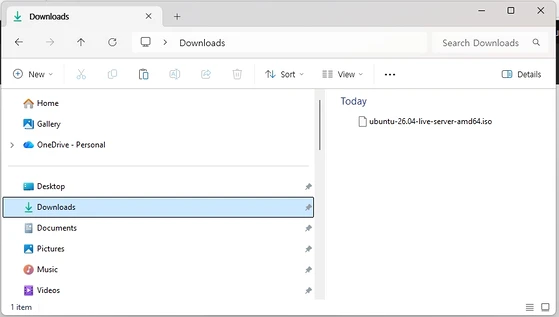
When the download finishes, find the .iso file in the Windows Downloads folder.
ubuntu-26.04-live-server-amd64.iso
The filename identifies:
26.04: the Ubuntu versionserver: a Server installation imageamd64: the architecture for Intel or AMD 64-bit PCs.iso: the installation image file format
3. Download Rufus
Simply copying the Ubuntu ISO onto a USB drive does not make it a bootable installation drive. On Windows, Rufus can create bootable USB installation media from an ISO.
Download Rufus from its official website.
- Download: https://rufus.ie/en/
4. Standard and Portable Versions
The Rufus download page provides Standard and Portable executables. Both run without an installation process.
According to the official FAQ, Portable creates rufus.ini by default when it runs. This file helps you carry Rufus settings between computers. If you use Rufus on only one computer, you can also choose Standard. I used Portable for this procedure.
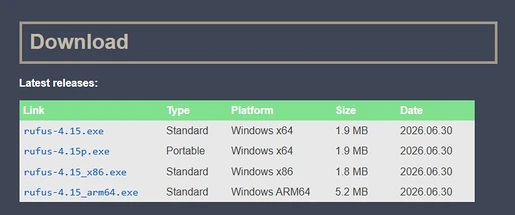
rufus-4.15p.exe
After downloading the executable from the official website, double-click it. If Windows displays a User Account Control prompt, check the file’s source and publisher before allowing it to run.
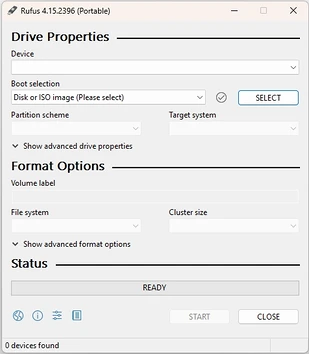
Do not configure Rufus yet. First check the boot mode of the computer on which you will install Ubuntu.
5. Check Whether the Older Computer Uses Legacy BIOS or UEFI
PCs use BIOS or UEFI firmware. Even a PC that supports UEFI may boot in Legacy or CSM mode, depending on its settings. Check the currently enabled boot mode before creating the USB drive with Rufus.
Legacy BIOS: a boot method commonly found on older computers.UEFI: a boot method used on more recent computers.
Not every older computer uses Legacy BIOS. Some support both UEFI and Legacy or CSM. Check the manufacturer’s manual or the BIOS settings screen to find the mode currently in use.
The Rufus FAQ also explains that you need to know whether the target computer uses BIOS or UEFI before creating the USB drive.
6. Rufus Settings for MBR and GPT
After checking the boot mode, choose Rufus’s Partition scheme and Target system. I used the following criteria on the Rufus screen I checked.
| Computer Boot Mode | Partition Scheme | Target System |
|---|---|---|
| Legacy BIOS | MBR | BIOS or UEFI-CSM |
| UEFI | GPT | UEFI |
Do not start writing the USB drive in Rufus if you have not confirmed the target computer’s boot mode. First check the manufacturer’s manual or firmware settings to determine whether UEFI or Legacy BIOS is in use.
For Legacy BIOS, check:
Boot selection: Ubuntu 26.04 LTS ISO
Partition scheme: MBR
Target system: BIOS or UEFI-CSM
For UEFI, check:
Boot selection: Ubuntu 26.04 LTS ISO
Partition scheme: GPT
Target system: UEFI
Available options may differ with the Rufus version and ISO. Check the actual screen to make sure Target system matches the target computer’s boot mode.
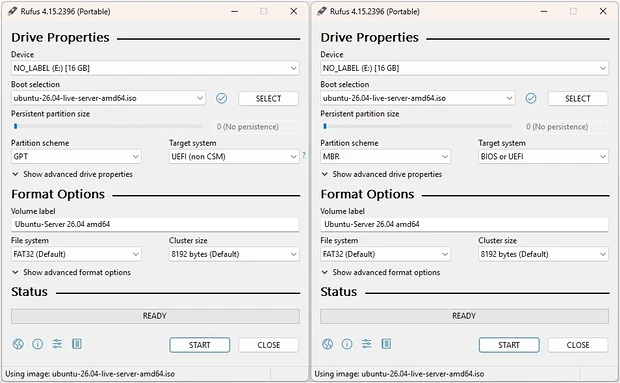
Do not click the Rufus start button yet. First check how to boot from USB.
7. Enter BIOS Setup or the Boot Menu
If the computer starts its existing operating system without reading the USB drive, its internal storage may be ahead of USB in the boot order. Check the boot mode in BIOS or UEFI settings and review how to boot from USB.
BIOS Setup and One-time Boot Menu Keys by Manufacturer
The following table lists representative keys checked against manufacturers’ official instructions. Keys can differ between product lines and models from the same manufacturer, so prioritize the startup screen and the official manual for your model.
| Manufacturer / Product | BIOS Setup | One-time Boot Menu | Notes |
|---|---|---|---|
| Intel NUC | F2 |
F10 |
Applies to the target computer in this article |
| Dell | F2 |
F12 |
Use the F12 One Time Boot Menu |
| HP | Esc, then F10 |
Esc, then F9 |
Select from the Startup Menu |
| Lenovo | F1 or F2 |
F12 |
Some models use an Fn combination or a Novo Button |
| ASUS Notebook | F2 |
Esc |
On some models, hold the key while pressing the power button from the powered-off state |
| ASUS Motherboard | Delete or F2 |
F8 within BIOS, or a model-specific key |
Check the motherboard manual |
| Acer | F2 |
F12 |
Some models require enabling F12 Boot Menu in BIOS |
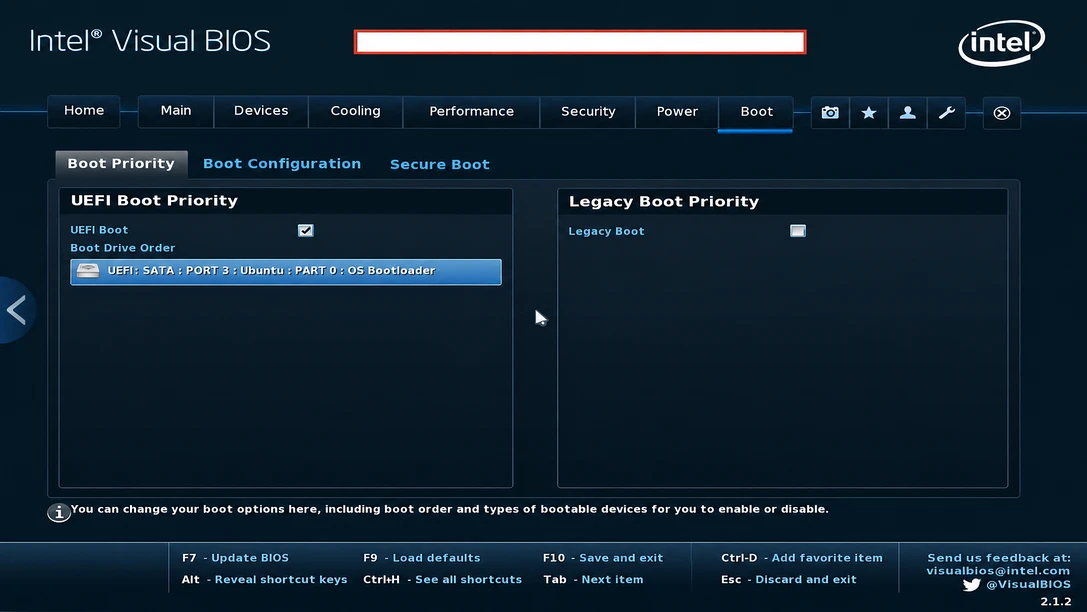
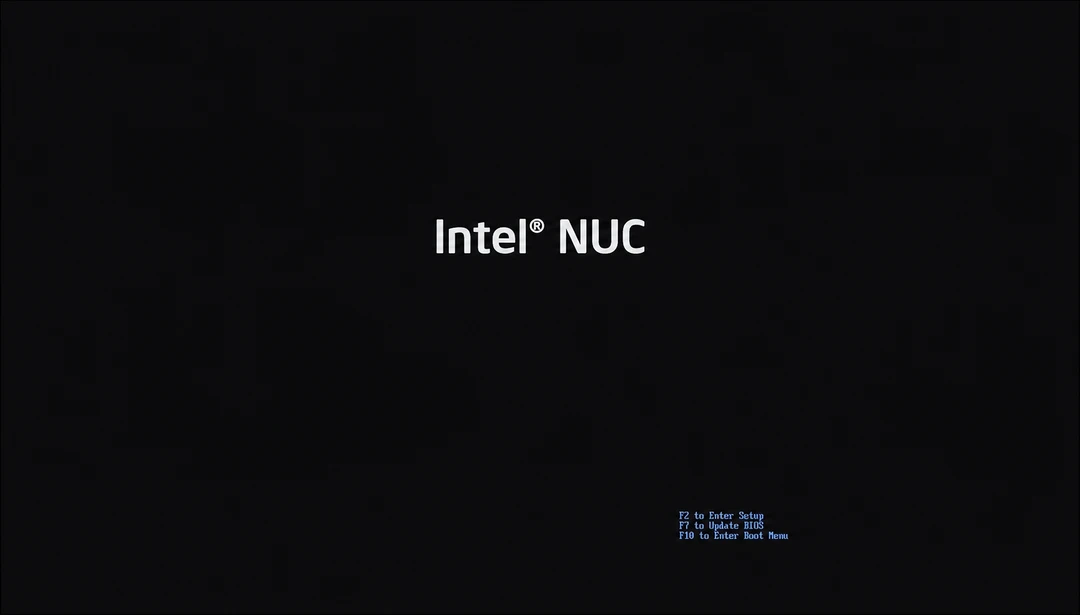
On the Intel NUC used here, pressing F2 immediately after power-on opens BIOS Setup. Pressing F10 opens the Boot Menu without changing the saved boot order.
When Function Keys Do Not Work
On a keyboard with independent function keys from F1 to F12, pressing F2 or F10 during startup worked normally. On a keyboard that requires holding Fn to enter function keys, combinations such as Fn+F2 or Fn+F10 may not be recognized during early startup.
If BIOS Setup or the Boot Menu does not open, use a wired USB keyboard with independent function keys. A Bluetooth keyboard may not connect before the operating system starts. Intel recommends trying a wired keyboard and a different USB port when BIOS entry keys do not work on a NUC.
8. Configure USB Boot Priority
After entering BIOS or UEFI settings, check the boot order. Menu names and locations differ between computers, but look for names such as:
Advanced
Boot
Boot Options
Boot Priority
Boot Order
Some computers place boot options under Advanced, while others provide a separate Boot menu from the outset.
Basic Setup Sequence
- Enter the BIOS or UEFI settings screen.
- Find
Boot,Boot Options, orBoot Priority. - Move the USB storage device to the first boot position.
- Save the changes.
- Restart the computer with the USB drive connected.
The settings screen may show something like:
Boot Option #1: USB Flash Drive
Boot Option #2: Internal SSD
Boot Option #3: Network
Use the Boot Menu Without Changing the Boot Order
To boot from USB just once, use the Boot Menu instead of changing the overall BIOS boot order. Press the manufacturer’s designated Boot Menu key at startup and select the USB device.
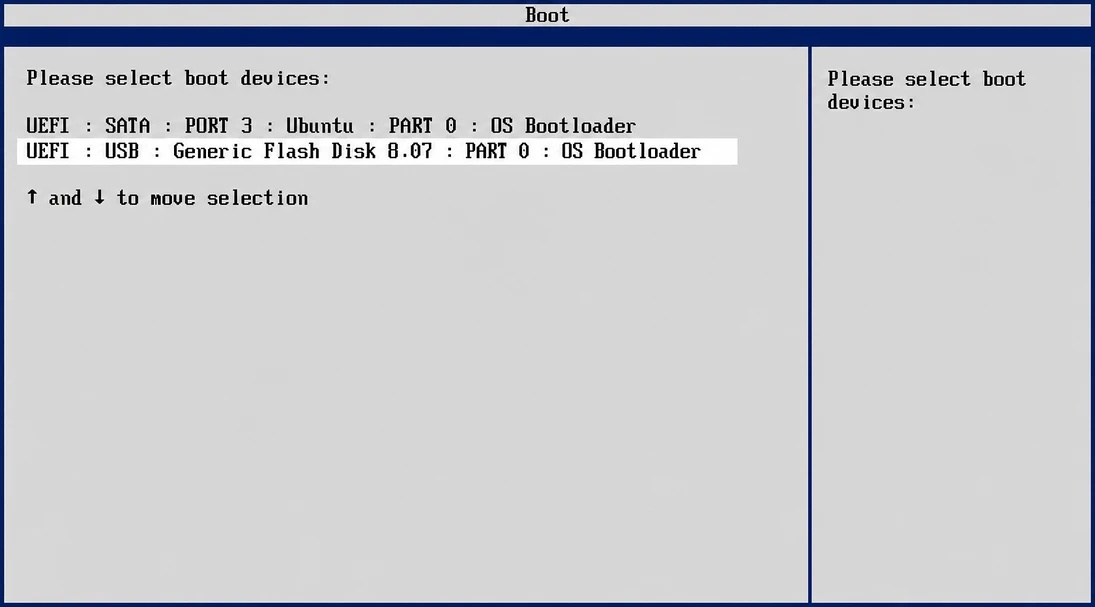
On the target Intel NUC, press F10 immediately after power-on to open the one-time Boot Menu. This does not change the default boot order saved in BIOS.
UEFI: USB Flash Drive
USB Storage Device
Generic Flash Disk
A USB drive created for UEFI boot may appear with UEFI: before its device name.
Check Your Preparation
After completing the preparation in this article:
- The Ubuntu 26.04 LTS Server ISO is saved on the Windows computer.
- Rufus Portable can run.
- Existing files on the USB drive have been backed up.
- The target computer’s use of Legacy BIOS or UEFI has been confirmed.
- The key for entering BIOS Setup or the Boot Menu has been identified.
- The appropriate Rufus settings have been determined for the boot mode.
Do not click the Rufus start button yet (시작 in the Korean screenshots; START in the English interface). Creating the bootable USB drive is covered in the next article.
9. Common Problems
The USB Drive Is Connected but Does Not Appear in Rufus
- Disconnect and reconnect the USB drive.
- Try another USB port.
- Connect directly to the computer instead of using a USB hub.
- Close and restart Rufus.
- If the USB drive contains important files, back them up before doing anything else.
The Computer Will Not Boot from the USB Drive You Created
- Check that USB boot is enabled in BIOS.
- Check that USB is ahead of the internal SSD in the boot priority.
- Check that the Rufus settings match Legacy BIOS or UEFI as appropriate.
- In the Boot Menu, choose either
UEFI: USB nameor the plainUSB nameentry according to the boot mode. - Try another USB port.
- If necessary, recheck the boot mode and Rufus settings, then recreate the USB drive.
There Is No Advanced Menu in BIOS
BIOS layouts differ between manufacturers. Do not look only for Advanced; also check for:
Boot
Startup
System Configuration
Boot Options
Boot Priority
Can I Download the AMD64 Image for an Intel Computer?
Most Intel 64-bit PCs can use Ubuntu’s amd64 image. In Ubuntu, amd64 refers to the 64-bit PC architecture based on AMD64 or Intel EM64T, not exclusively to AMD processors.
Precautions and Limitations
- Rufus deletes data on the selected USB drive when creating installation media, so identify the target device carefully.
- BIOS menus and entry keys vary by manufacturer and model.
- On computers supporting both UEFI and Legacy or CSM, first check the currently enabled boot mode.
- This article covers only preparing the ISO and Rufus and checking the USB boot environment. It does not cover creating the bootable USB drive or installing Ubuntu.
- Function key behavior may vary with the keyboard’s function row,
Fn Lockstate, and firmware initialization behavior.
10. Preparing for the Next Installation Step
In this step, you have not installed Ubuntu. You have prepared the necessary files and the computer’s boot environment in this order:
Download the Ubuntu 26.04 LTS ISO
→ Download Rufus
→ Check Legacy BIOS or UEFI
→ Check the Rufus settings for the boot mode
→ Check how to boot from USB using BIOS or the Boot Menu
The key point is not to click the Rufus start button before checking the computer’s boot mode. First confirm Legacy BIOS or UEFI, then choose the appropriate MBR or GPT settings to follow the preparation process in order.
In the next step, you will use the prepared Ubuntu ISO and Rufus to create a bootable USB drive and check whether the older computer reaches the USB installation screen.
Next Steps
- Previous article: None — this is the first article in Server Setup.
- Next article: Creating an Ubuntu 26.04 LTS Bootable USB Drive with Rufus
Topics for the next article:
- Connect the USB drive to Windows and identify the correct device in Rufus
- Select the Ubuntu 26.04 LTS Server ISO
- Set MBR or GPT and the target system to match Legacy BIOS or UEFI
- Check the file system and remaining Rufus options
- Review the USB data deletion warning and start writing the ISO
- Safely remove the USB drive when writing is complete
- Select the USB drive in the Boot Menu and check that the installer appears
- Check settings and error causes if the USB drive is missing or will not boot
Writing and Verification Information
- Author: apple2ne1
- Reviewer recorded in the source Korean article: apple2ne1
- Firsthand work: based on the sequence performed by the author and recorded in the Korean article
- Last review date recorded in the source article: July 27, 2026
- Verification method recorded in the source article: comparison of actual screens with official documentation from Ubuntu, Rufus, Intel, and PC manufacturers
- Target hardware recorded in the source article: Intel NUC Kit D34010WYKH, Intel Visual BIOS 2.1.2
This English version translates the Korean article’s recorded procedure. It does not represent a separate installation test in an English environment.
References and Sources
- Official Ubuntu Server Download — Ubuntu 26.04 LTS Server image and architecture — July 14, 2026
- Ubuntu 26.04 LTS Release Images — Server image filename, purpose, and size — July 14, 2026
- Official Rufus Website — Standard and Portable executables and ISO-based bootable USB support — July 14, 2026
- Official Rufus FAQ — Standard versus Portable and BIOS/UEFI requirements — July 14, 2026
- Intel Core i3-4010U Specifications — Intel 64 support — July 15, 2026
- Intel NUC BIOS Settings Glossary —
F2BIOS Setup — July 15, 2026 - Intel NUC BIOS Update Readme —
F10Boot Menu — July 15, 2026 - Unable to Enter BIOS Setup with F2 on an Intel NUC — Checking a wired keyboard and USB ports — July 15, 2026
- Dell Boot Menu Instructions —
F12 One Time Boot Menu— July 15, 2026 - HP Boot Device Options —
Esc,F9, andF10Startup Menu keys — July 15, 2026 - Lenovo UEFI and Boot Menu Instructions —
F12Boot Menu — July 15, 2026 - ASUS USB Boot Instructions —
EscandF8within BIOS — July 15, 2026